Step 1: Find the right link on the homepage
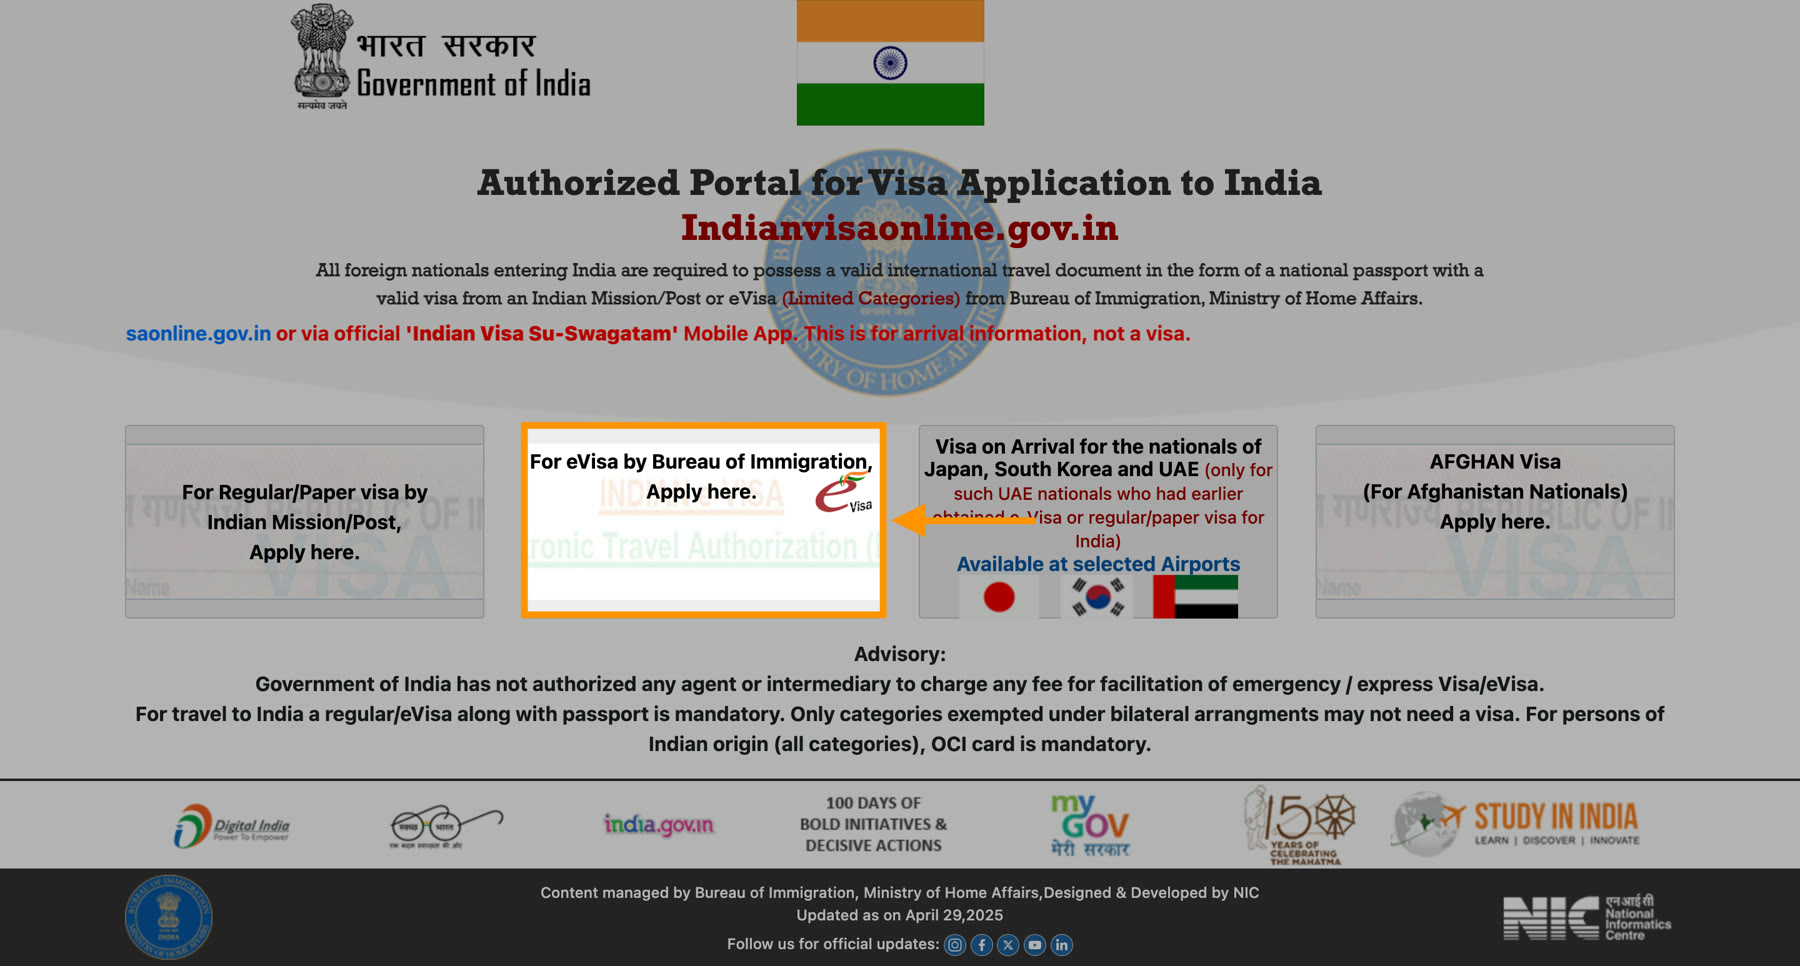
The Government of India homepage at indianvisaonline.gov.in shows four boxes. Only one is relevant for most travelers:
Click "For eVisa by Bureau of Immigration."
Ignore the other three unless they apply to you specifically:
- Regular/Paper visa: only if you're not eligible for eVisa (check the eligibility list in Step 2).
- Visa on Arrival: only for Japan, South Korea, and returning UAE nationals.
- AFGHAN Visa: Afghanistan nationals only.
Step 2: Check you're eligible before you go further
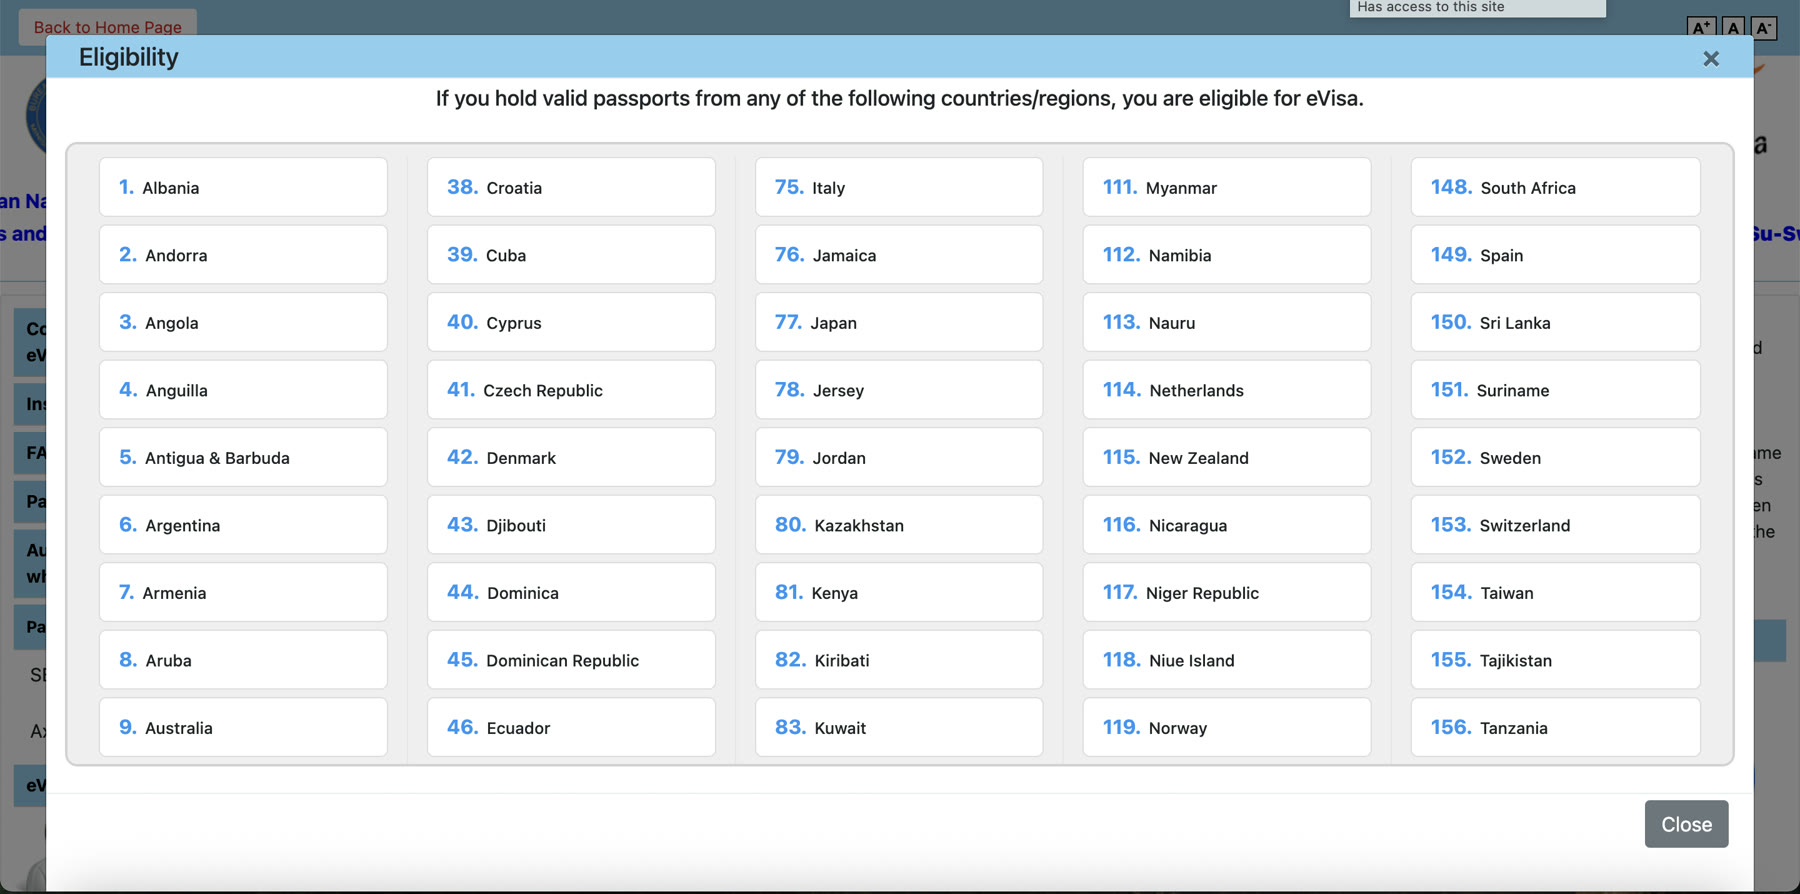
Before filling anything in, confirm your passport country is on the eligible list. Over 150 countries qualify for the e-Visa. The full list is searchable on the eligibility page linked from the sidebar.
Step 3: Land on the e-Visa info page and click "Apply here for e-visa"
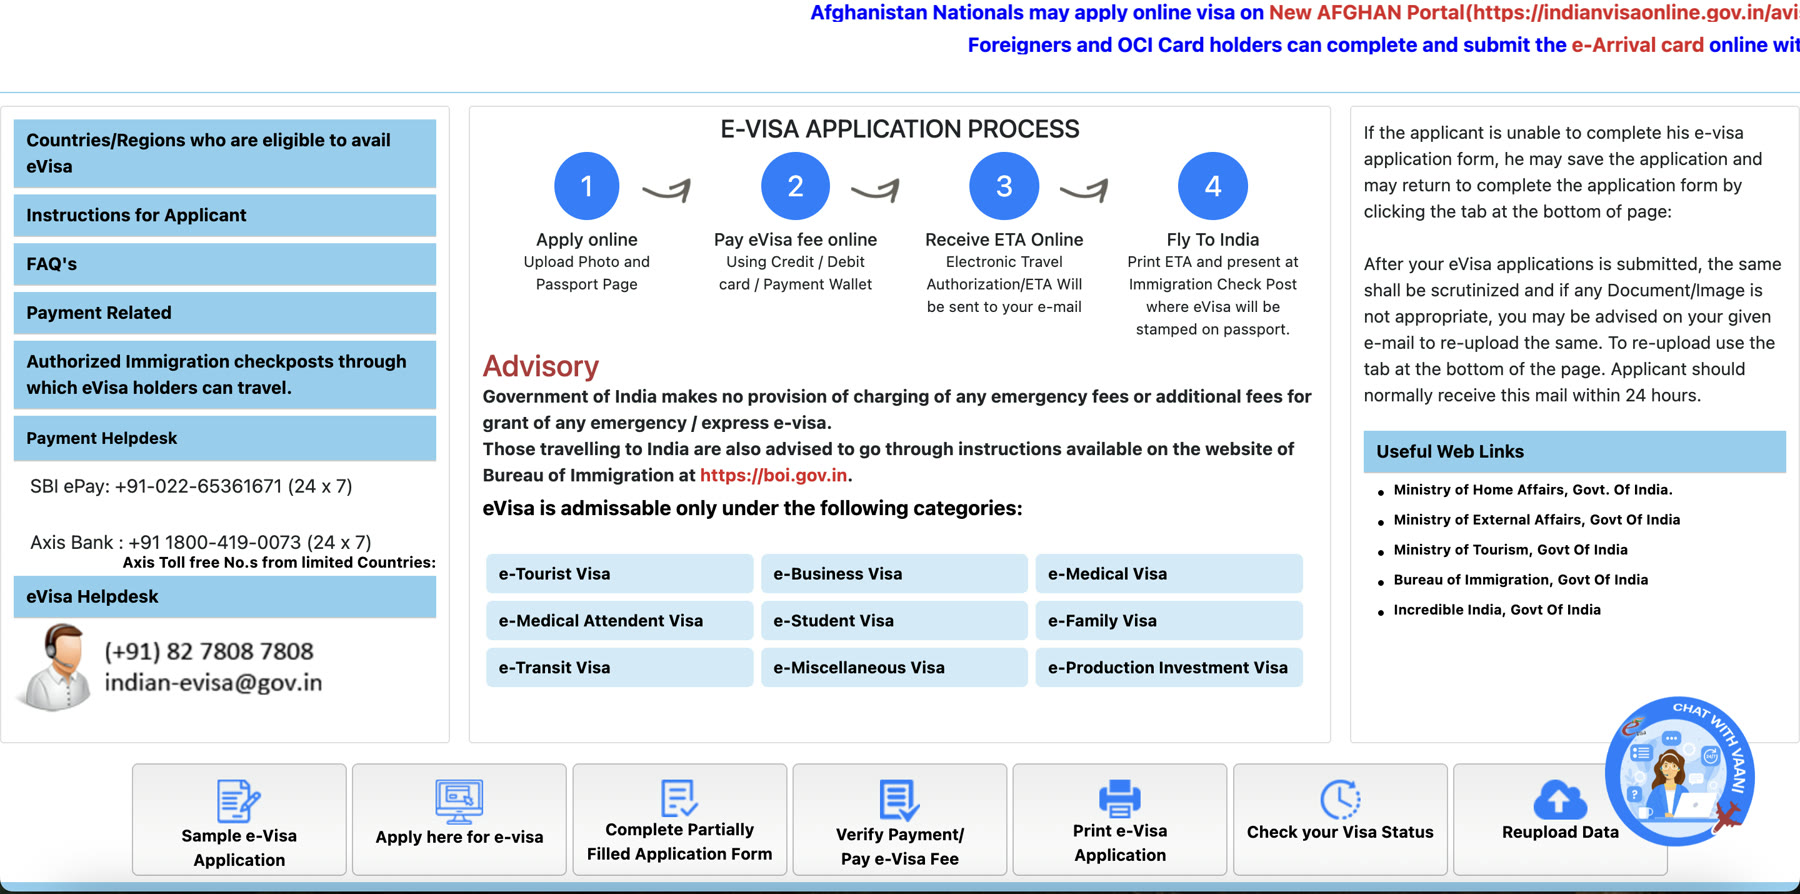
This page has seven buttons at the bottom. You only need one right now:
Click "Apply here for e-visa."
The other six (Sample Application, Complete Partially Filled Form, Verify Payment, Print Application, Check Visa Status, Reupload Data) are for later stages of your application. You'll come back to "Verify Payment" after you pay, and "Print Application" once your ETA is granted. Don't worry about them now.
This page also confirms the e-Visa is only valid for these categories: e-Tourist, e-Business, e-Medical, e-Medical Attendant, e-Student, e-Family, e-Transit, e-Miscellaneous, and e-Production Investment visas. Most leisure travelers want e-Tourist Visa.
Step 4: What to know before you fill in the form
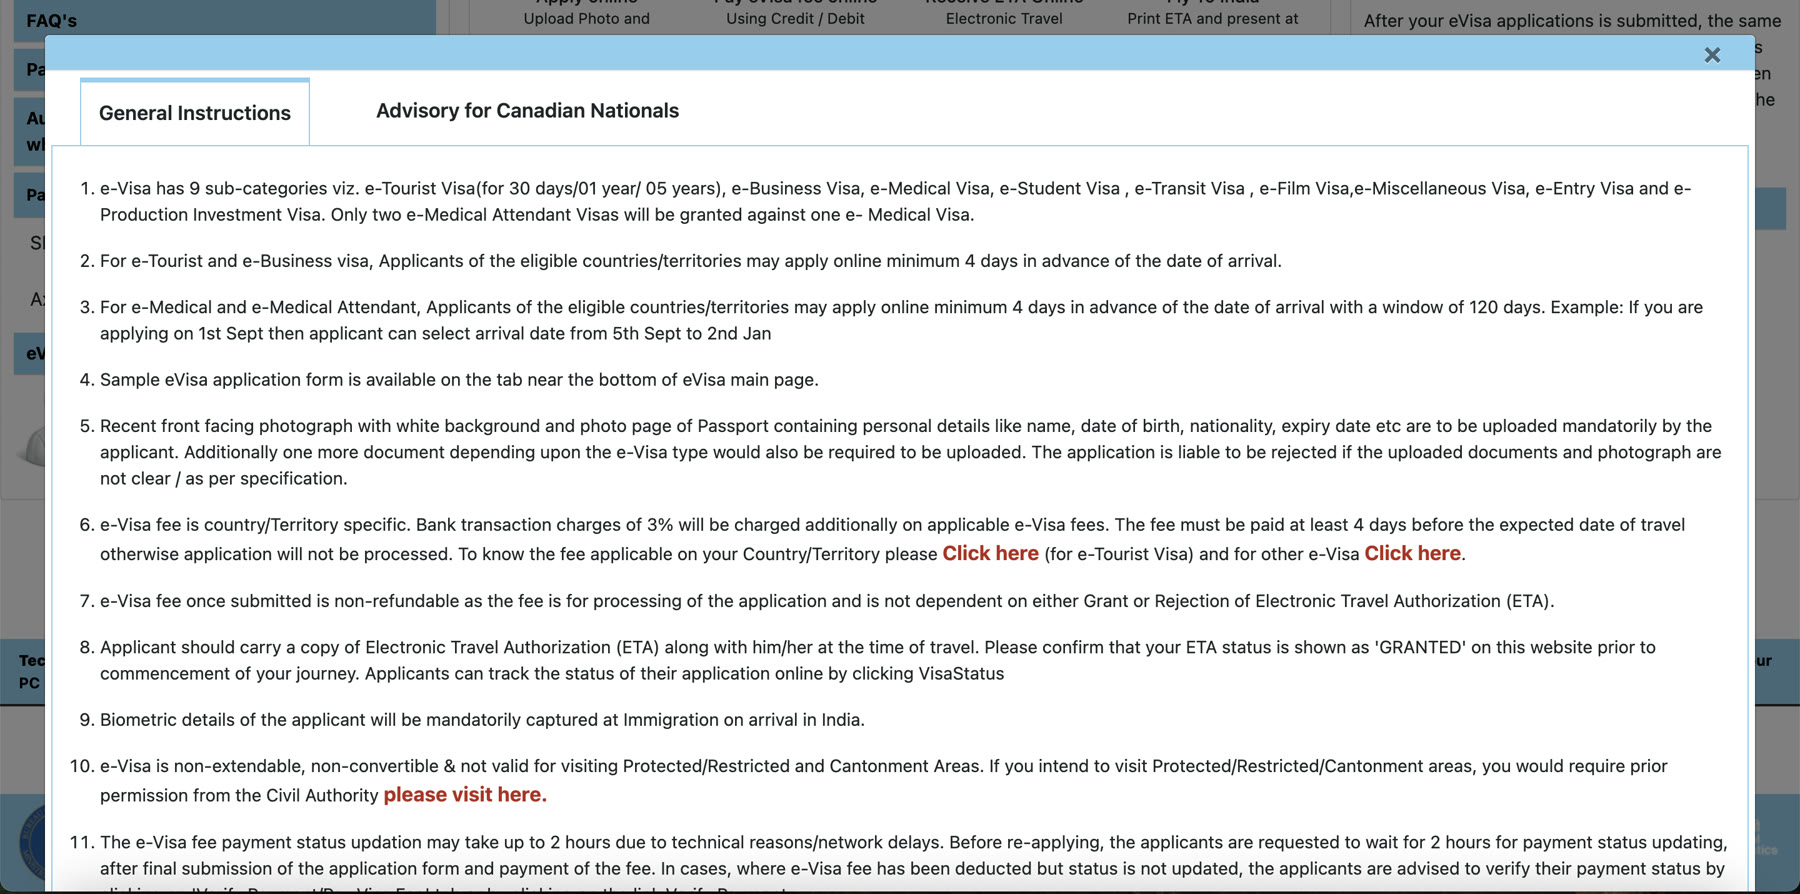
The official instructions modal has 11+ rules in small print. Here are the ones that actually matter if you're a tourist applying for the first time:
- Apply at least 4 days before your arrival date for e-Tourist and e-Business visas. Don't leave this to the last minute.
- Upload a recent front-facing photo with a white background, plus your passport photo page. Blurry or non-compliant uploads are a common reason for rejection.
- The visa fee is non-refundable once submitted, whether or not your application is approved.
- Your ETA (Electronic Travel Authorization) is not your visa. It's confirmation you can travel. The actual visa is stamped on your passport at the immigration checkpost on arrival.
- Biometrics are captured at the airport, not during the online application.
Before Step 5: A screening question may appear first
Some applicants see a short screen before the main form: your Passport Number, Nationality, and Name (as in passport), followed by one yes/no question asking whether you've visited the Democratic Republic of Congo, Uganda, or South Sudan in the last 21 days (a yellow fever screening check). If you see this, answer it before the main application form loads. (Confirm on your next test run whether this always appears, or only for certain nationalities.)
Step 5: Fill in the application form
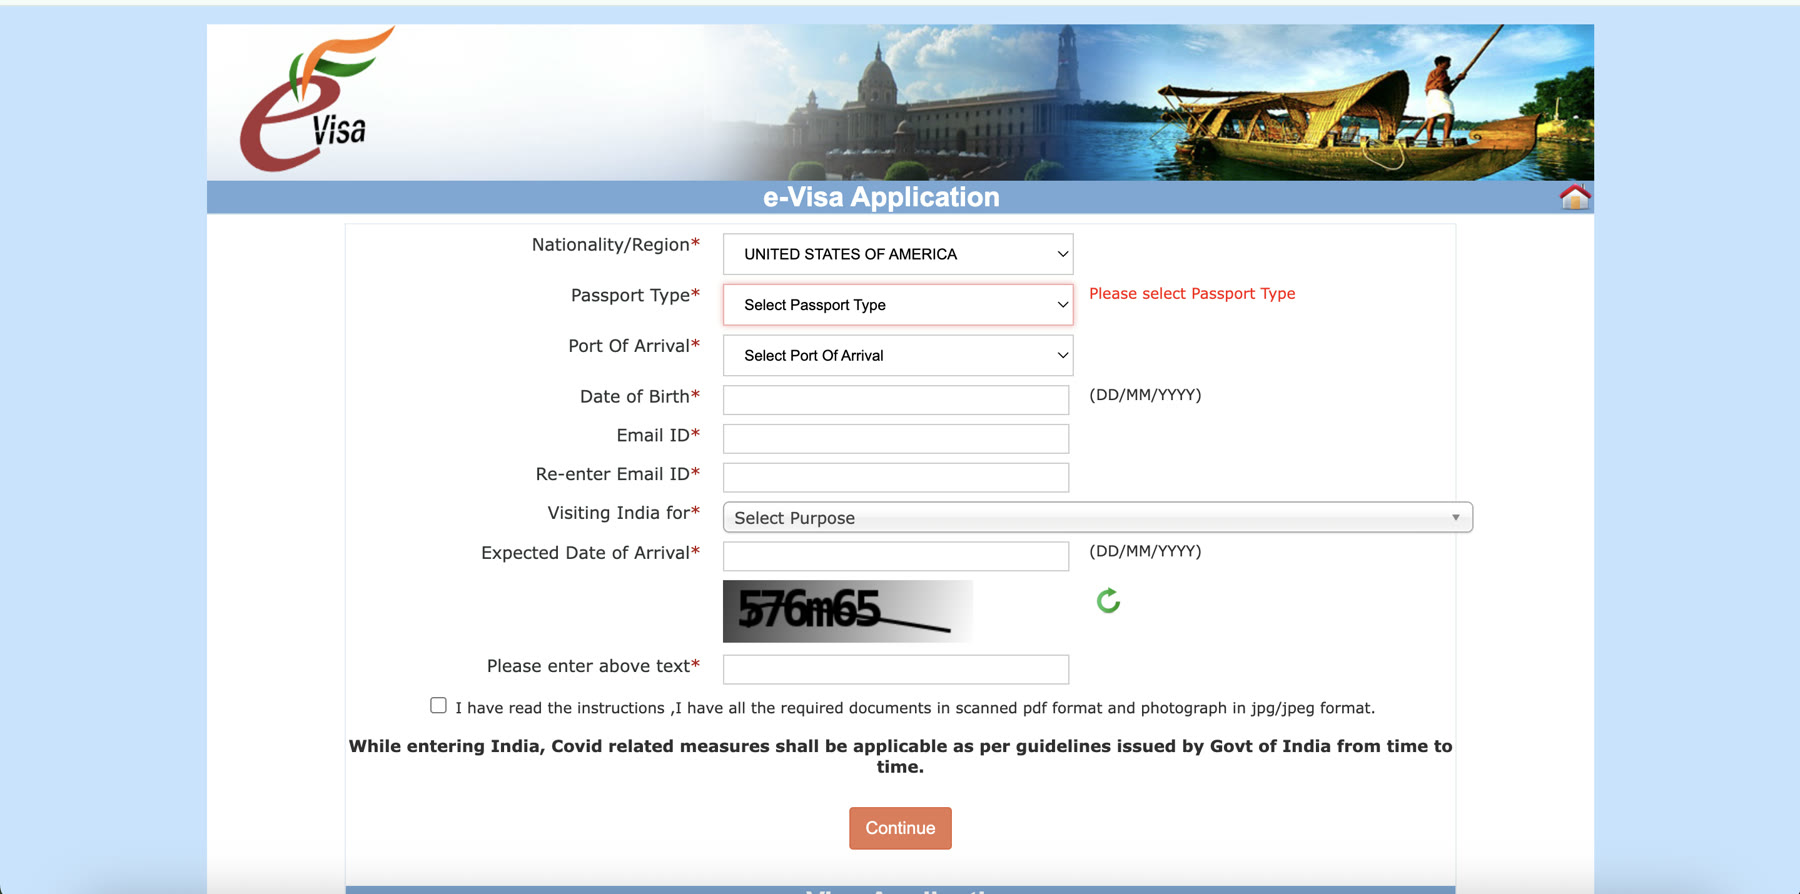
Here's what the blank form actually looks like, and the order fields appear in:
- Nationality/Region: select your country. This unlocks the "Visiting India for" field further down, which stays hidden until you do this. If you don't see it yet, that's expected, not a bug.
- Passport Type: choose "Ordinary" unless you specifically hold a diplomatic or official passport. This covers almost everyone.
- Port of Arrival: select the Indian airport you're landing at.
- Date of Birth: format is DD/MM/YYYY, shown right next to the field. If you're used to the US MM/DD/YYYY convention, double-check this before submitting.
- Email ID (and re-enter): use an address you check regularly; your ETA and any re-upload requests come here, usually within 24 hours.
- Visiting India for: appears after Step 1 above. Scroll the dropdown for the entry starting with "e-Tourist Visa 30 days" if you're a leisure traveler. The list uses roman-numeral prefixes for ordering; ignore those, just match the visa name.
- Expected Date of Arrival: format DD/MM/YYYY. Must be at least 4 days out (see Step 4).
- CAPTCHA: enter the distorted text shown. Use the refresh icon if it's illegible.
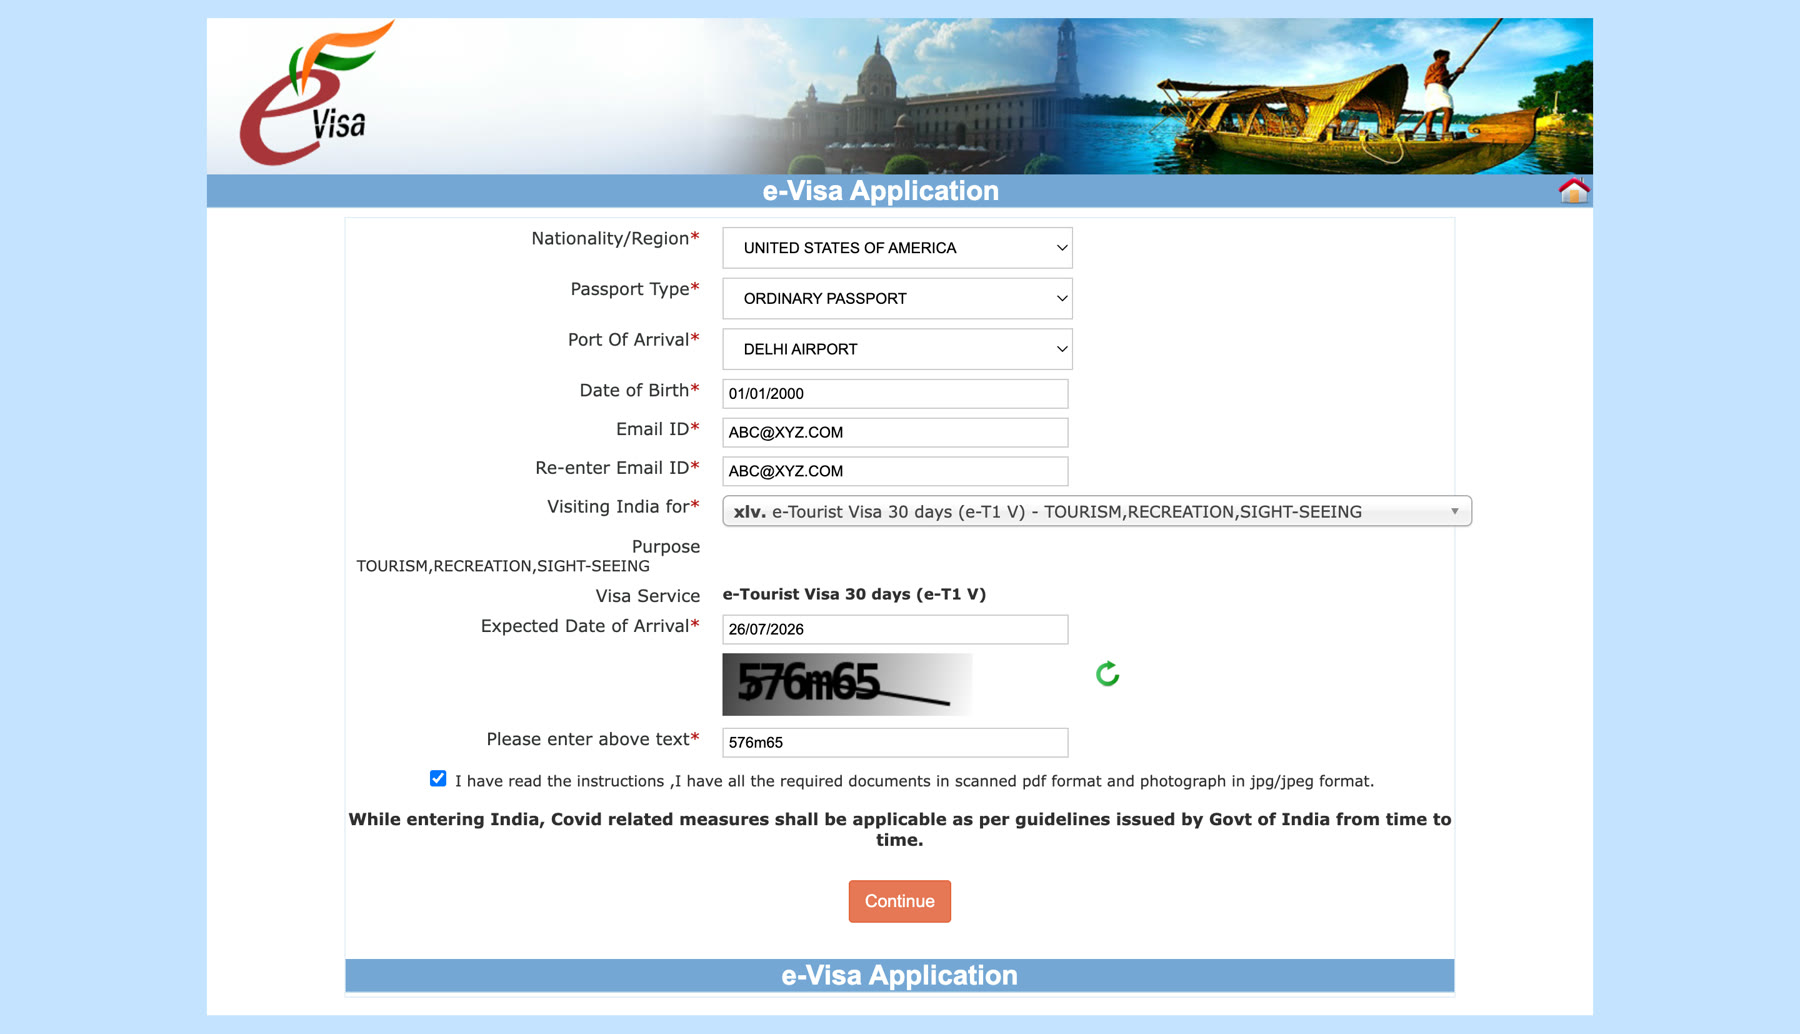
Once every field is filled correctly, check the box confirming you have your documents ready, and click Continue.
Step 6: The preliminary screen: Passport No, Country, Name
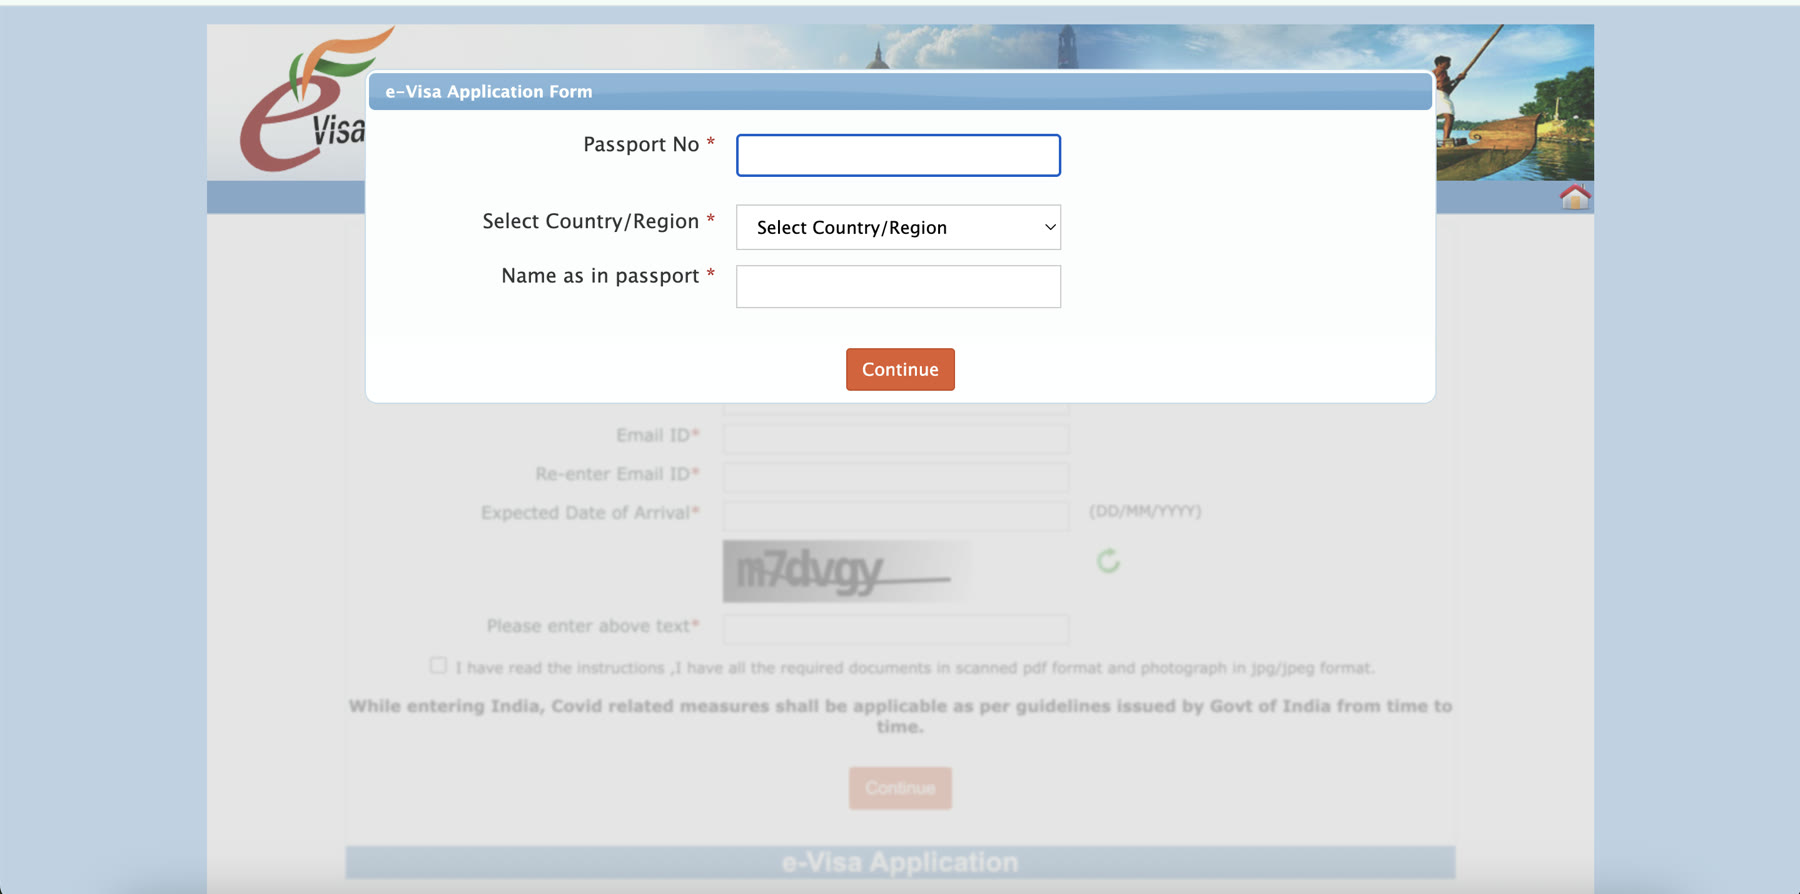
Before the main application form, you'll land on a short screen asking for:
- Passport Number
- Country/Region: select from the dropdown.
- Name as in passport
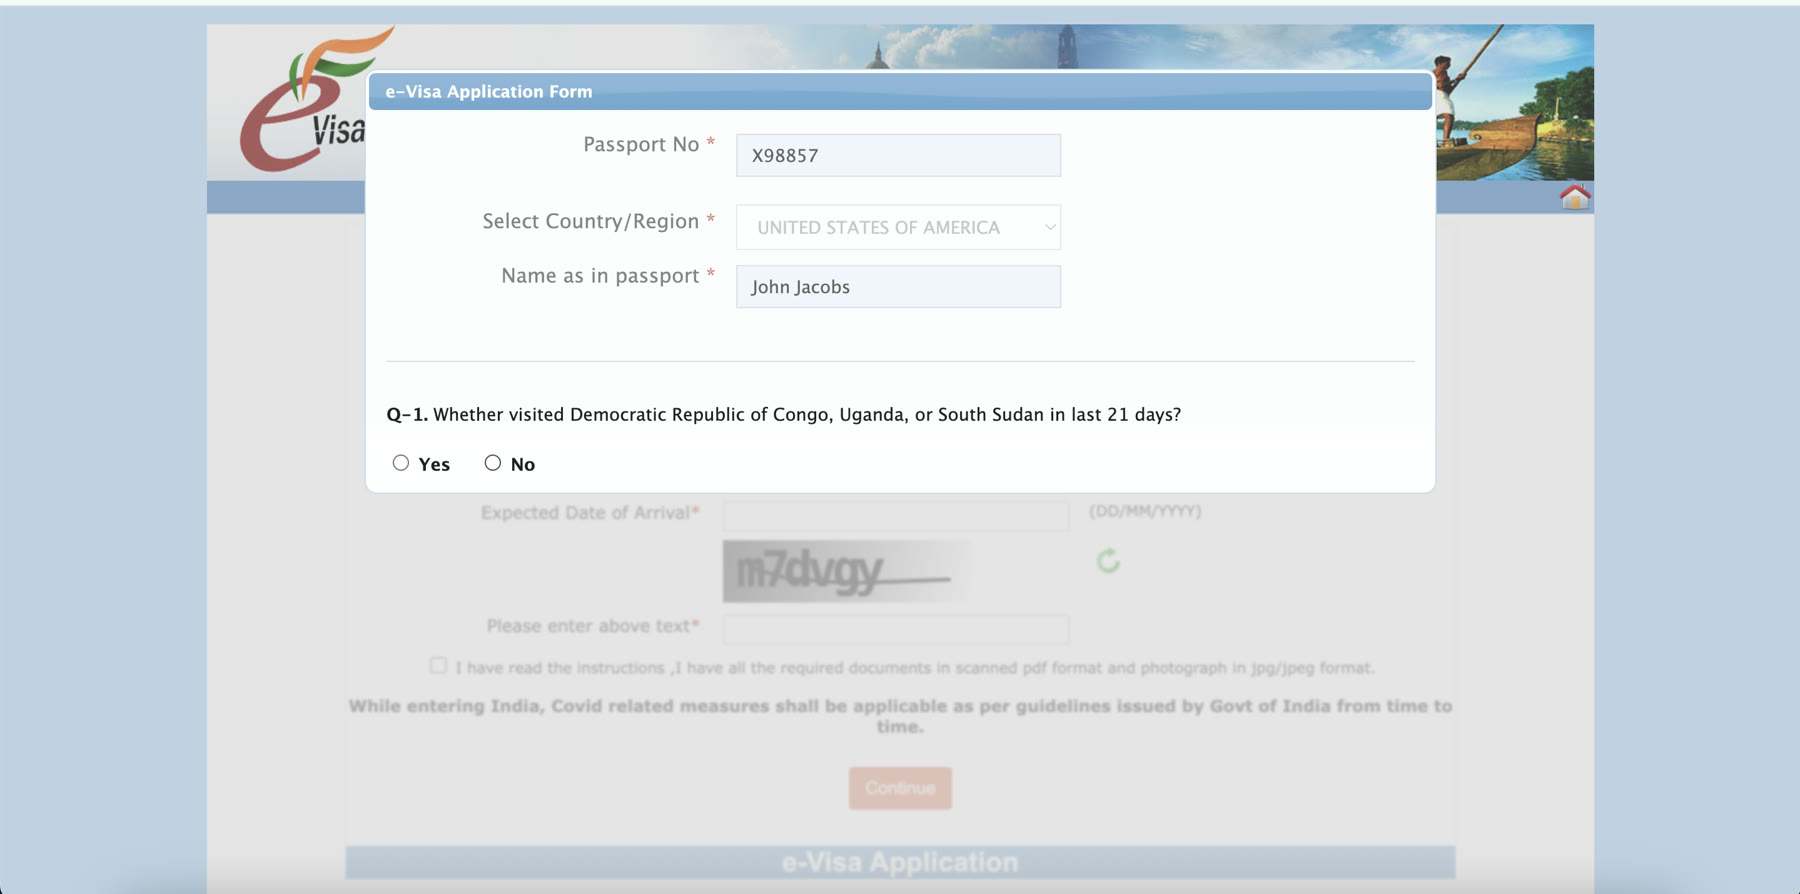
Once all three are filled, a fourth question appears on the same screen: "Whether visited Democratic Republic of Congo, Uganda, or South Sudan in the last 21 days?" (a yellow fever screening check). Answer Yes or No, then click Continue. The button stays disabled until this question is answered.
Step 7: Applicant Details Form
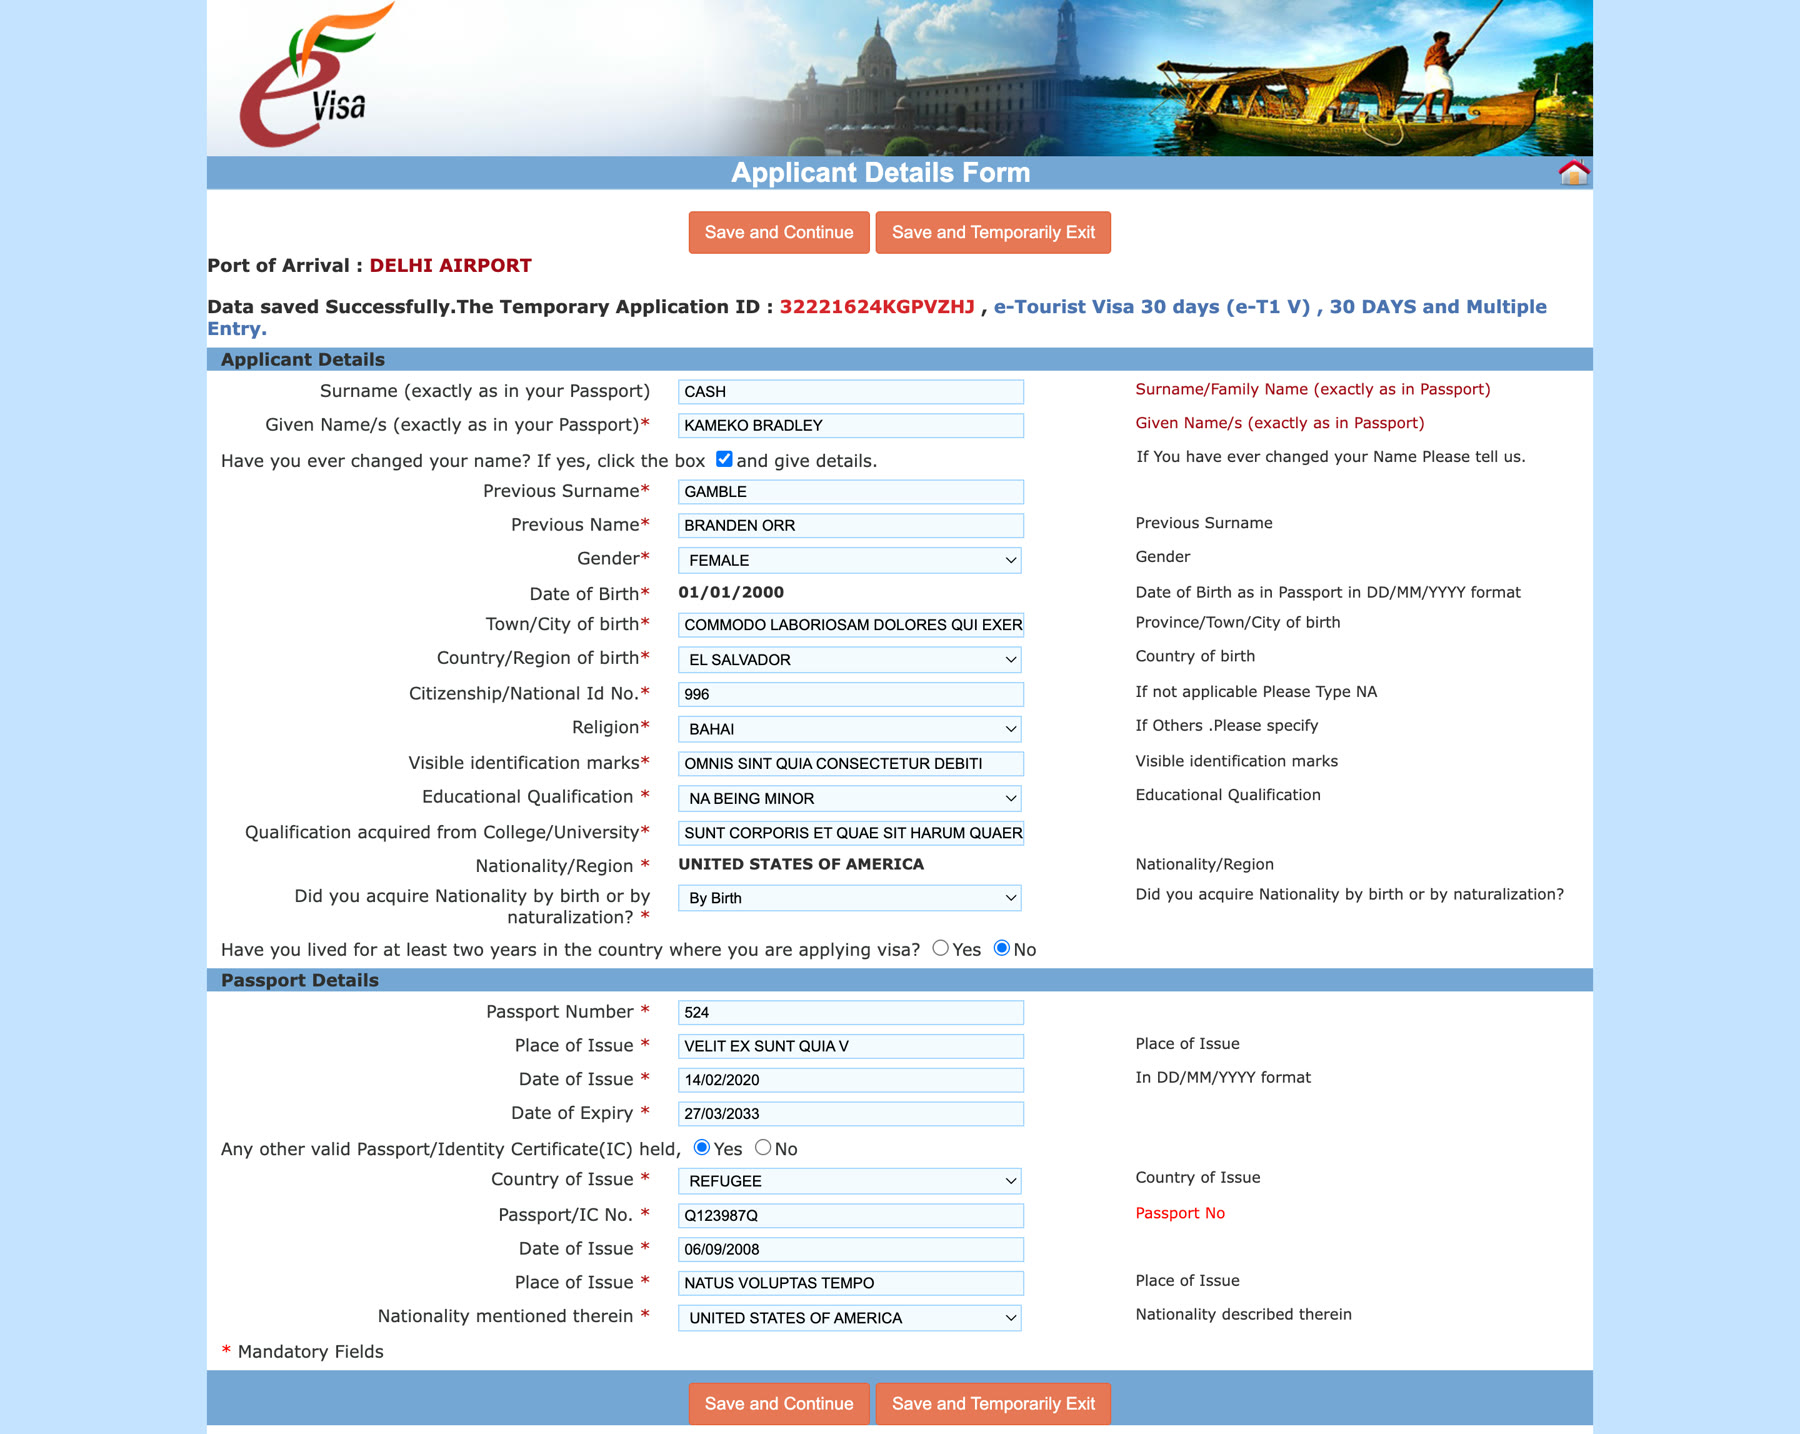
This is the longest section of the application. It's broken into clear blocks:
- Name & personal details: surname and given name exactly as in your passport, whether you've ever changed your name, gender, date/town/country of birth, citizenship or national ID number, religion, visible identification marks, and education.
- Nationality: confirm how you acquired it (by birth or naturalization), and whether you've lived at least 2 years in the country you're applying from.
- Passport details: passport number, place/date of issue, expiry date, and whether you hold any other valid passport or dual nationality.
Nothing here auto-fills except your date of birth and nationality, which carry over from Step 5.
Step 8: Address & Family Details
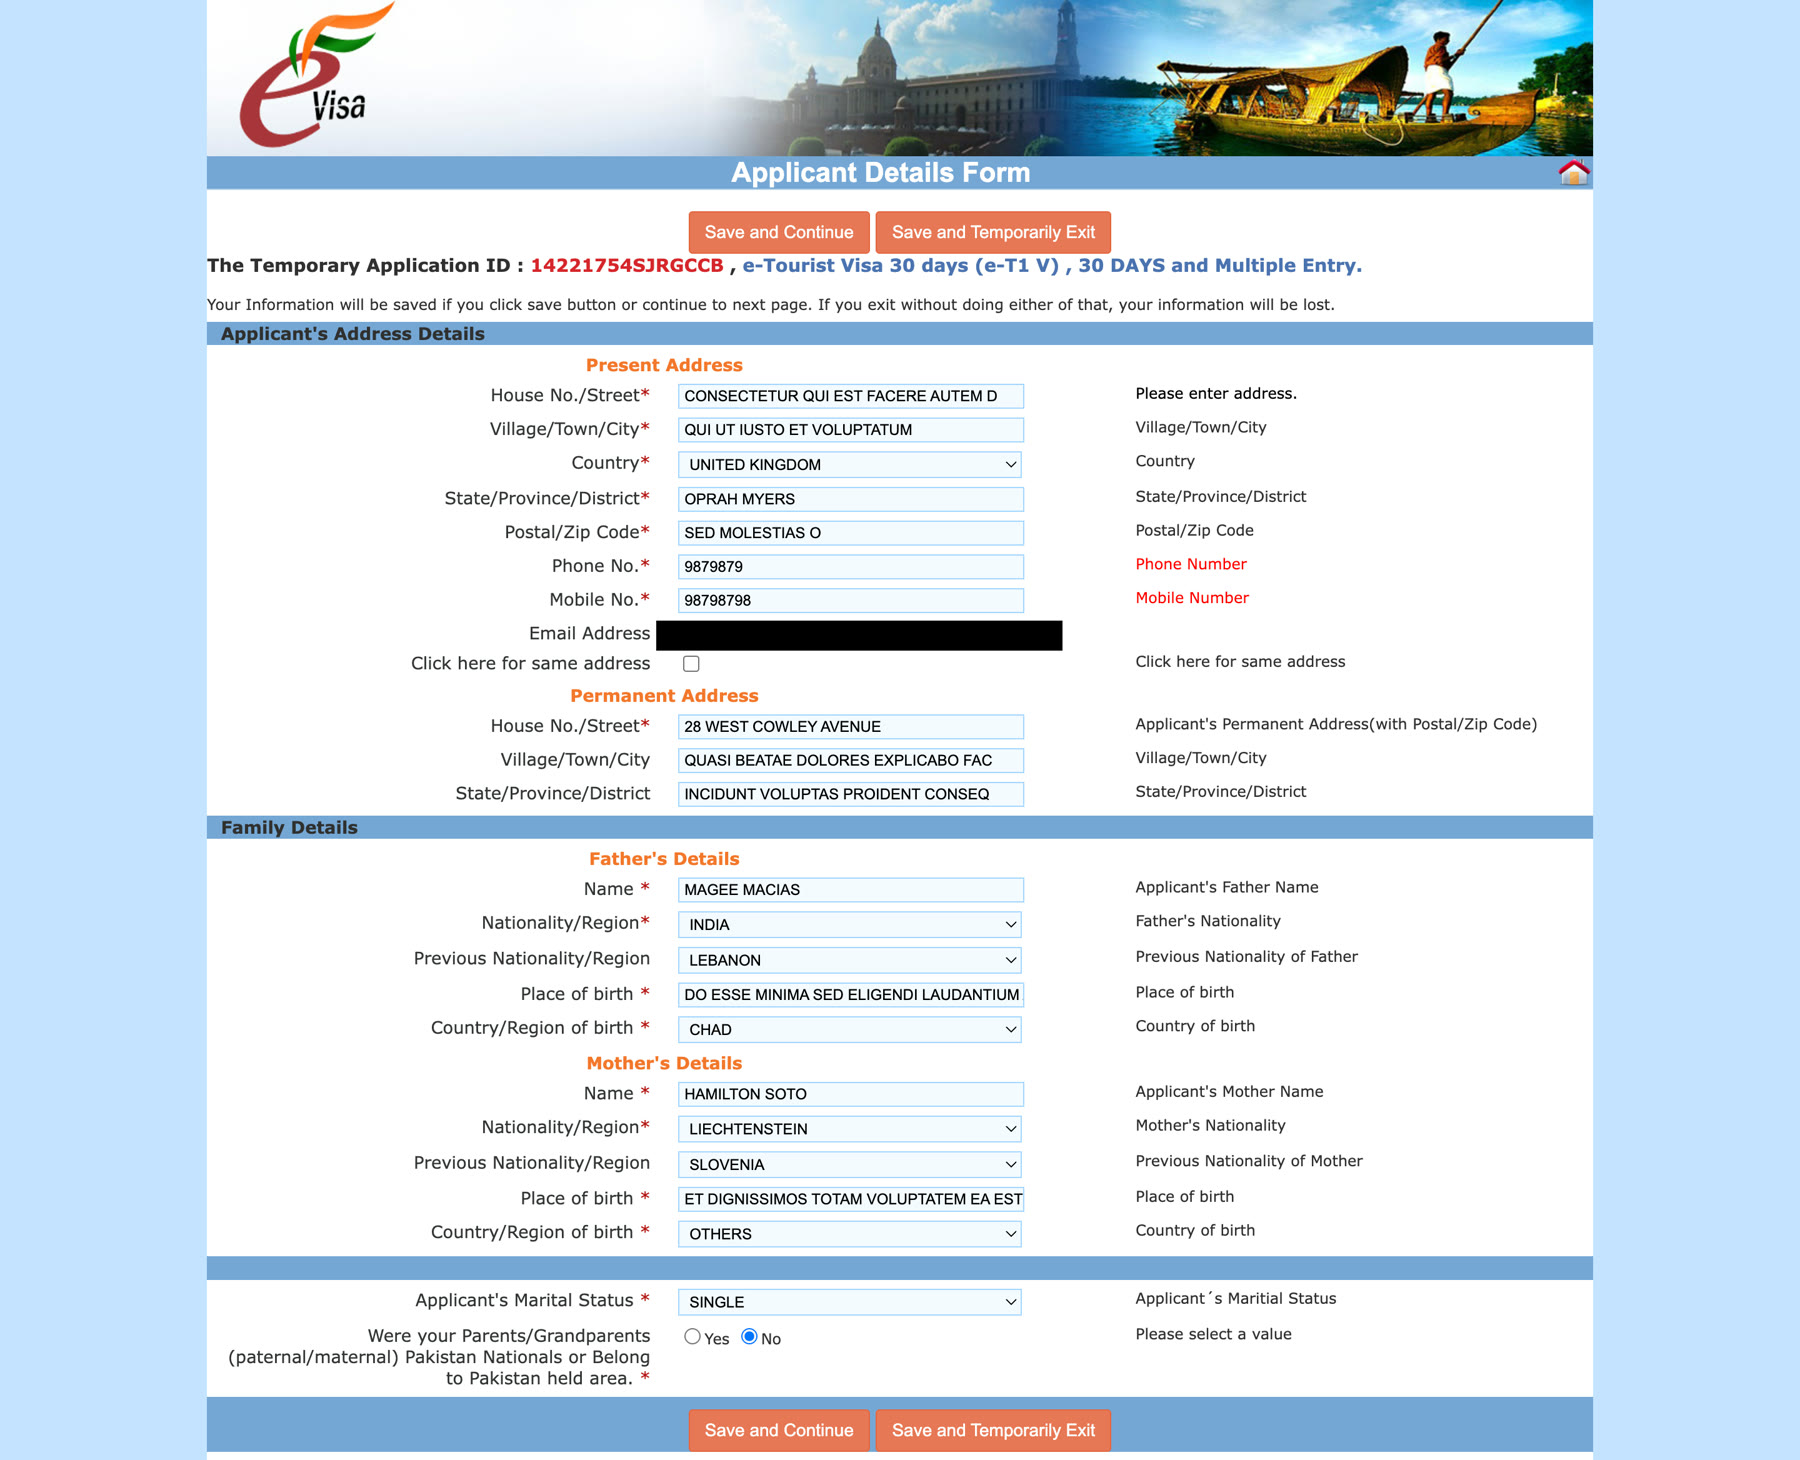
- Present address: house number/street, village/town/city, country, state/province, postal code, phone, and mobile (one contact number is mandatory).
- Permanent address: a checkbox lets you copy your present address if they're the same.
- Family details: your father's and mother's full names, nationality, previous nationality, and place/country of birth, required even if a parent is deceased.
- Marital status, and spouse details if married.
- A question asking whether your parents or grandparents (paternal or maternal) were Pakistani nationals or from a Pakistan-held area. In our verified test run, this defaulted to "No," not "Yes" as some older unofficial guides claim. Still, read it carefully and answer accurately; this field gets flagged again for double-checking at final review.
Note: many applicants will also see a Profession / Occupation Details block here (present occupation, employer name, designation, address, and a military/police background question). We've since confirmed it appears on current applications, and the layout can vary by nationality. The Present Occupation dropdown is mandatory and changes which fields appear below it, which trips up retirees, unemployed applicants, students, and housewives in particular. Our dedicated guide walks through the full list and exactly what to enter in each case: Present Occupation on the India e-Visa Form: Full List and What to Select.
Step 9: Visa Details Sought
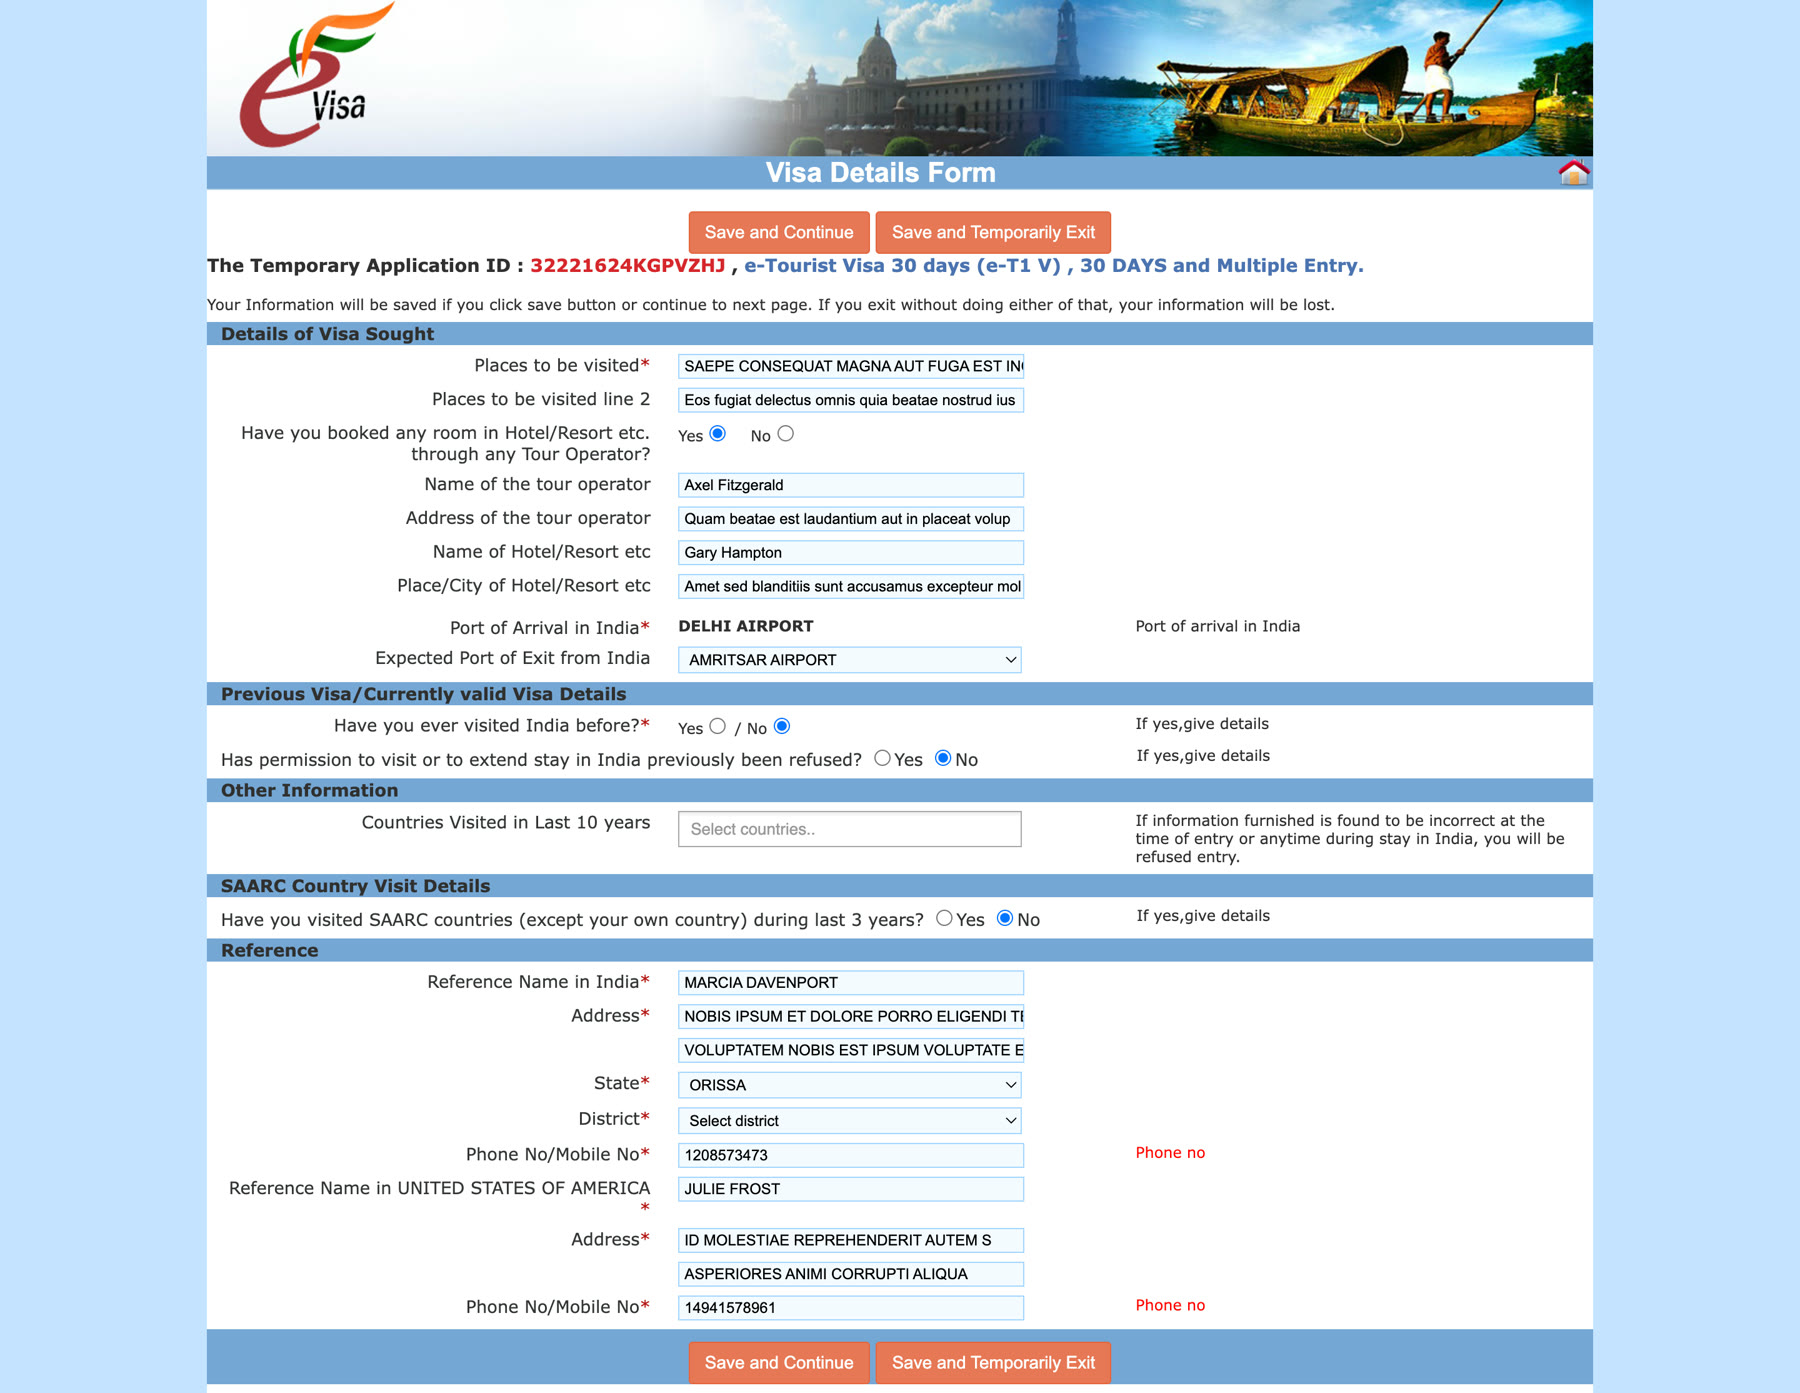
- Places to be visited in India (two lines available).
- Whether you've booked a hotel/resort through a tour operator: if yes, you'll need the operator's name and address, plus the hotel name and city.
- Port of Arrival (carries over from Step 5) and Expected Port of Exit from India.
- Previous visa history: have you visited India before, and has entry or an extension ever been refused.
- Countries visited in the last 10 years and SAARC countries visited in the last 3 years (both optional, not mandatory fields).
- References: one contact in India (your accommodation details usually work) and one in your home country (a relative, friend, or colleague), each with address and phone number. The India reference also requires you to select a State and District from dropdowns. Not sure what to enter? See the full guide to the Reference Name in India field.
Step 10: Additional Question Details
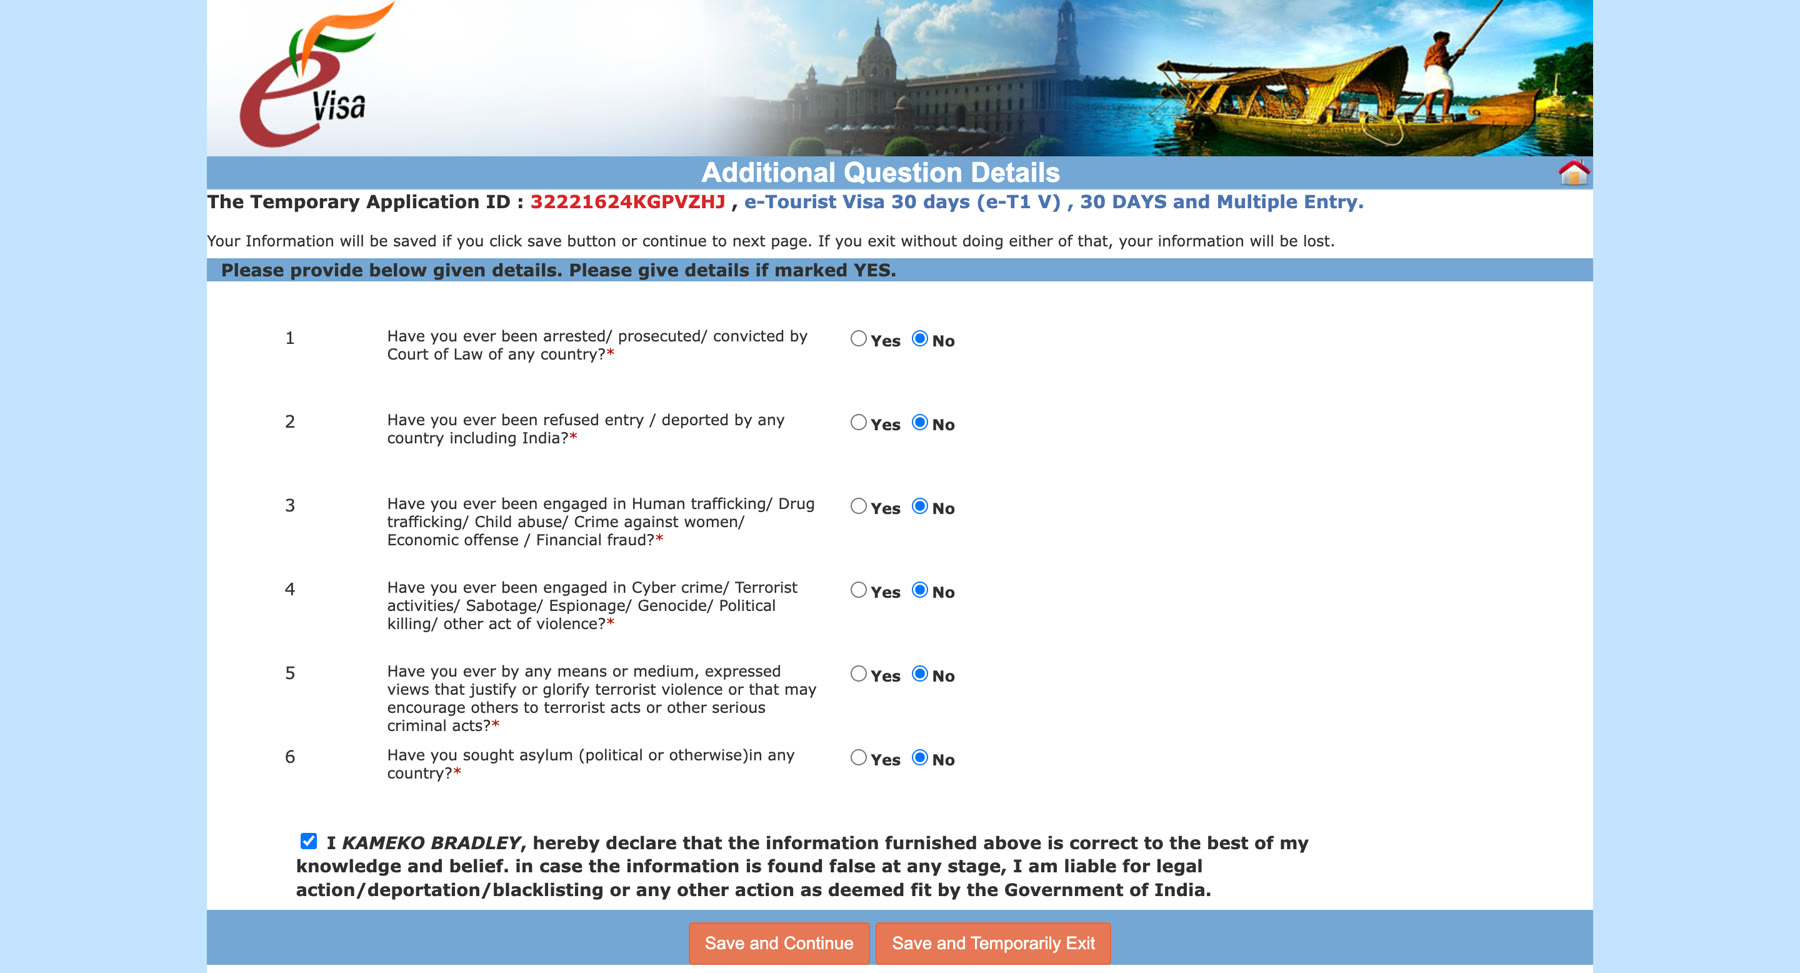
Six direct declaration questions, all Yes/No:
- Have you ever been arrested, prosecuted, or convicted by a Court of Law of any country?
- Have you ever been refused entry or deported by any country, including India?
- Have you ever been engaged in human trafficking, drug trafficking, child abuse, crime against women, or financial fraud?
- Have you ever been engaged in cybercrime, terrorism, sabotage, espionage, genocide, or political killing?
- Have you ever expressed views that justify or glorify terrorist violence, or that may encourage others toward serious criminal acts?
- Have you ever sought asylum, political or otherwise, in any country?
Answer honestly. False information can lead to legal action, deportation, or blacklisting. Check the declaration box at the bottom confirming the information you've provided is correct, then continue.
Step 11: Upload your photo
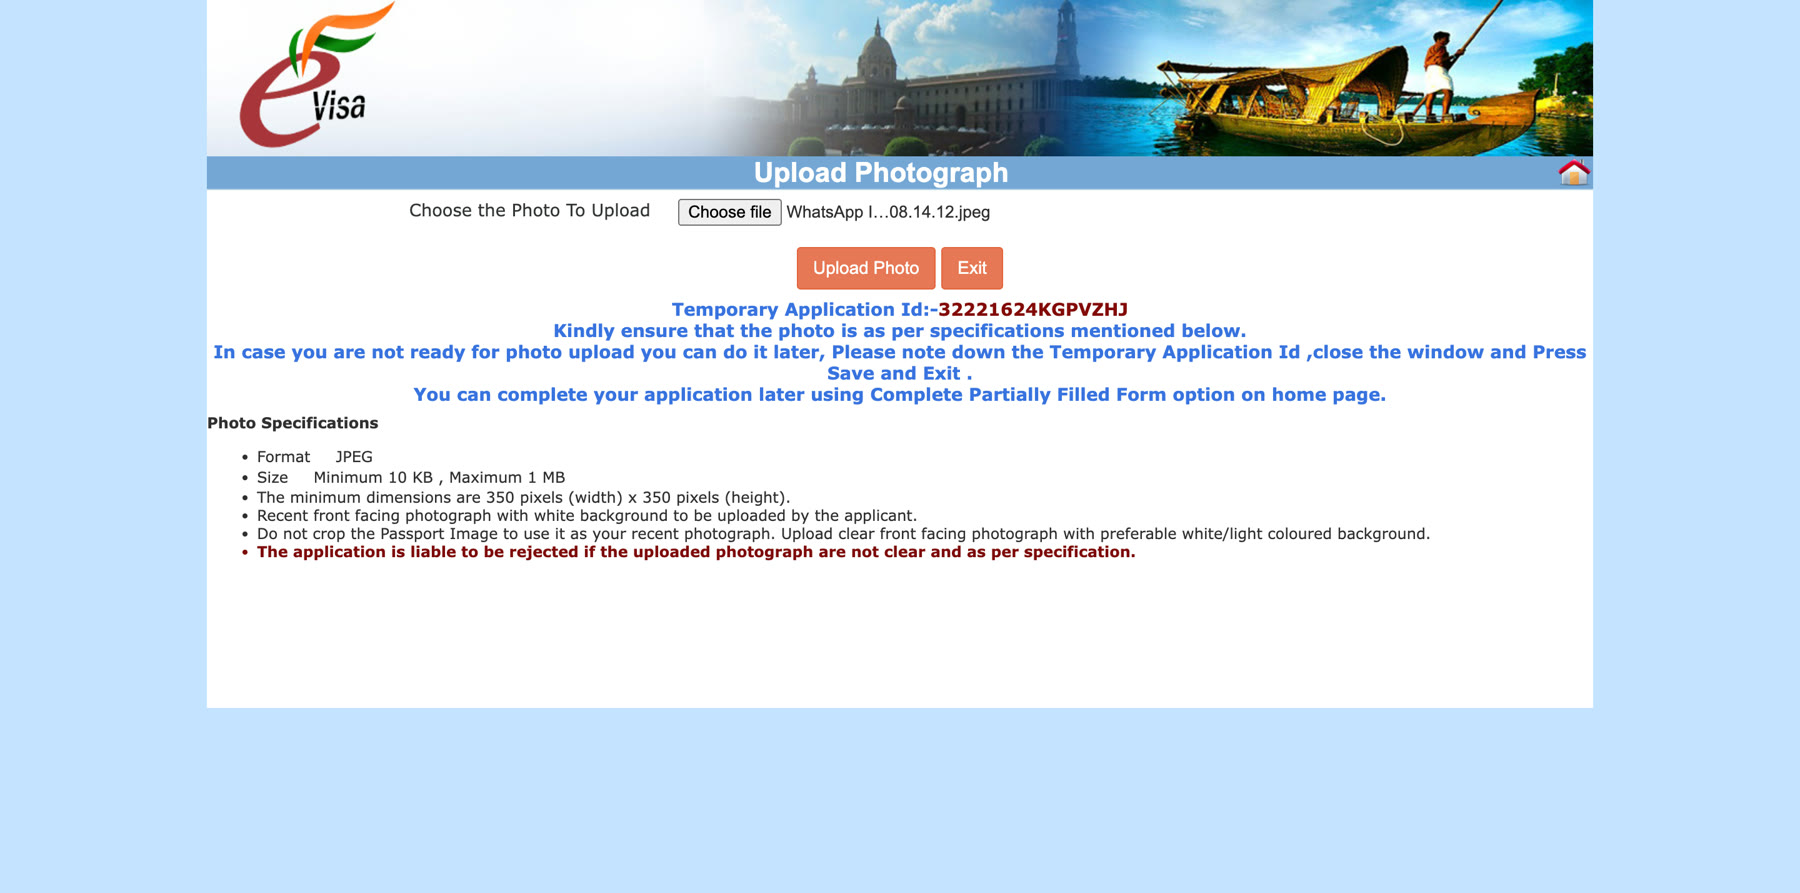
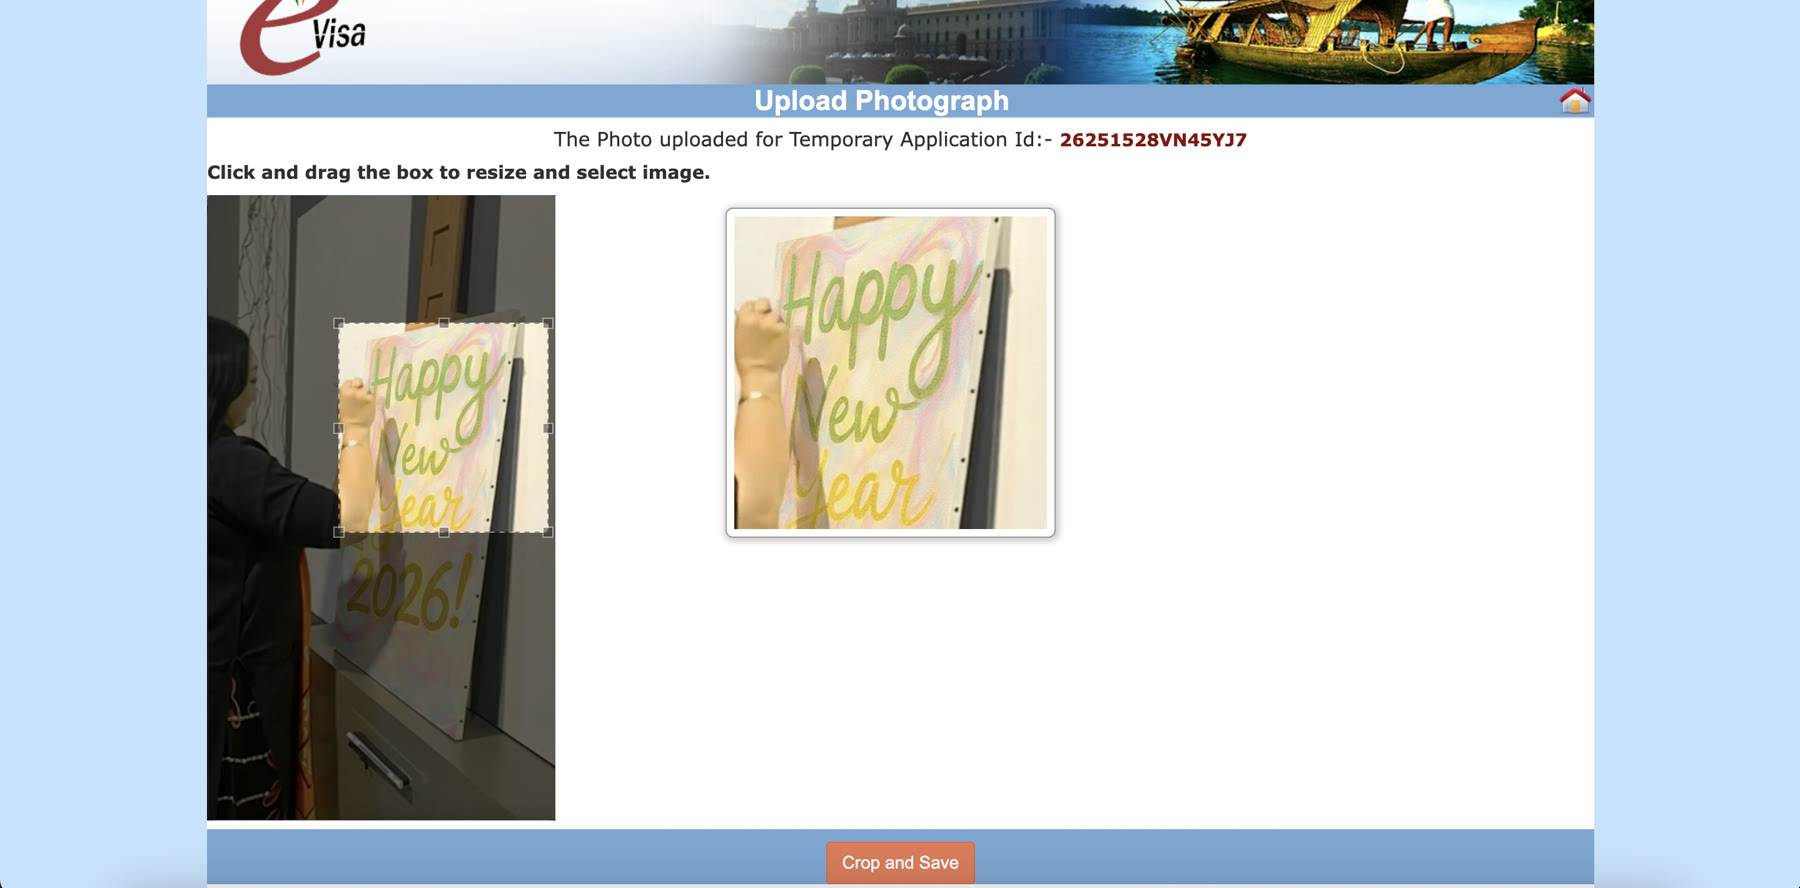
- Click Choose file, select your photo (JPEG, 10KB to 1MB, minimum 350×350px), and click Upload Photo.
- A Temporary Application ID appears on this page. Write it down now. If you need to stop and come back later, this ID (with "Save and Exit") is how you'll pick up where you left off.
- After uploading, you'll get a crop tool: click and drag the box over your photo to select the right region, then click Crop and Save.
Step 12: Upload your passport page
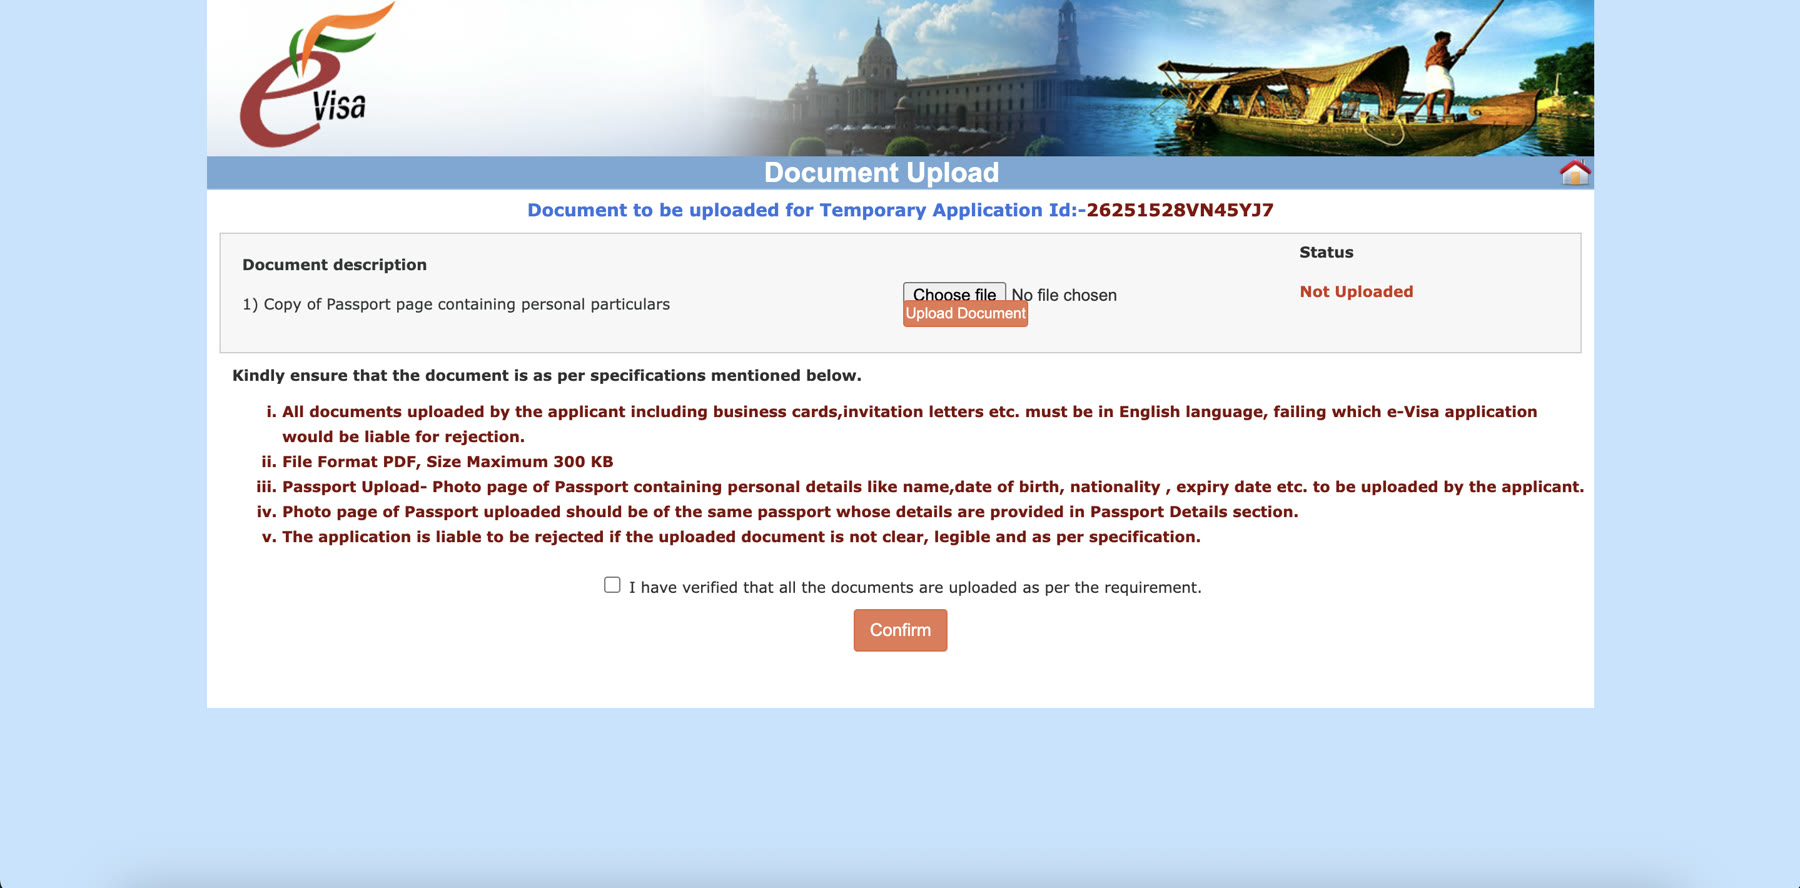
Click Choose file and select your passport photo page (PDF format, maximum 300KB, which is stricter than the photo requirement, so compress ahead of time if needed). Click Upload Document, then check the box confirming you've verified the upload matches the specification, and click Confirm.
Step 13: Review and verify everything
Screen recording: reviewing the full application summary before payment
This page shows a full summary of everything you've entered, with your uploaded photo displayed at the top. Read through it carefully. This is your last chance to fix mistakes before payment.
Double-check the Pakistani parentage question specifically. This is the one field flagged by past applicants as easy to get wrong, since it resets if you exit and re-enter the form partway through.
If everything's correct, click Verified and Continue. To fix something, click Modify instead.
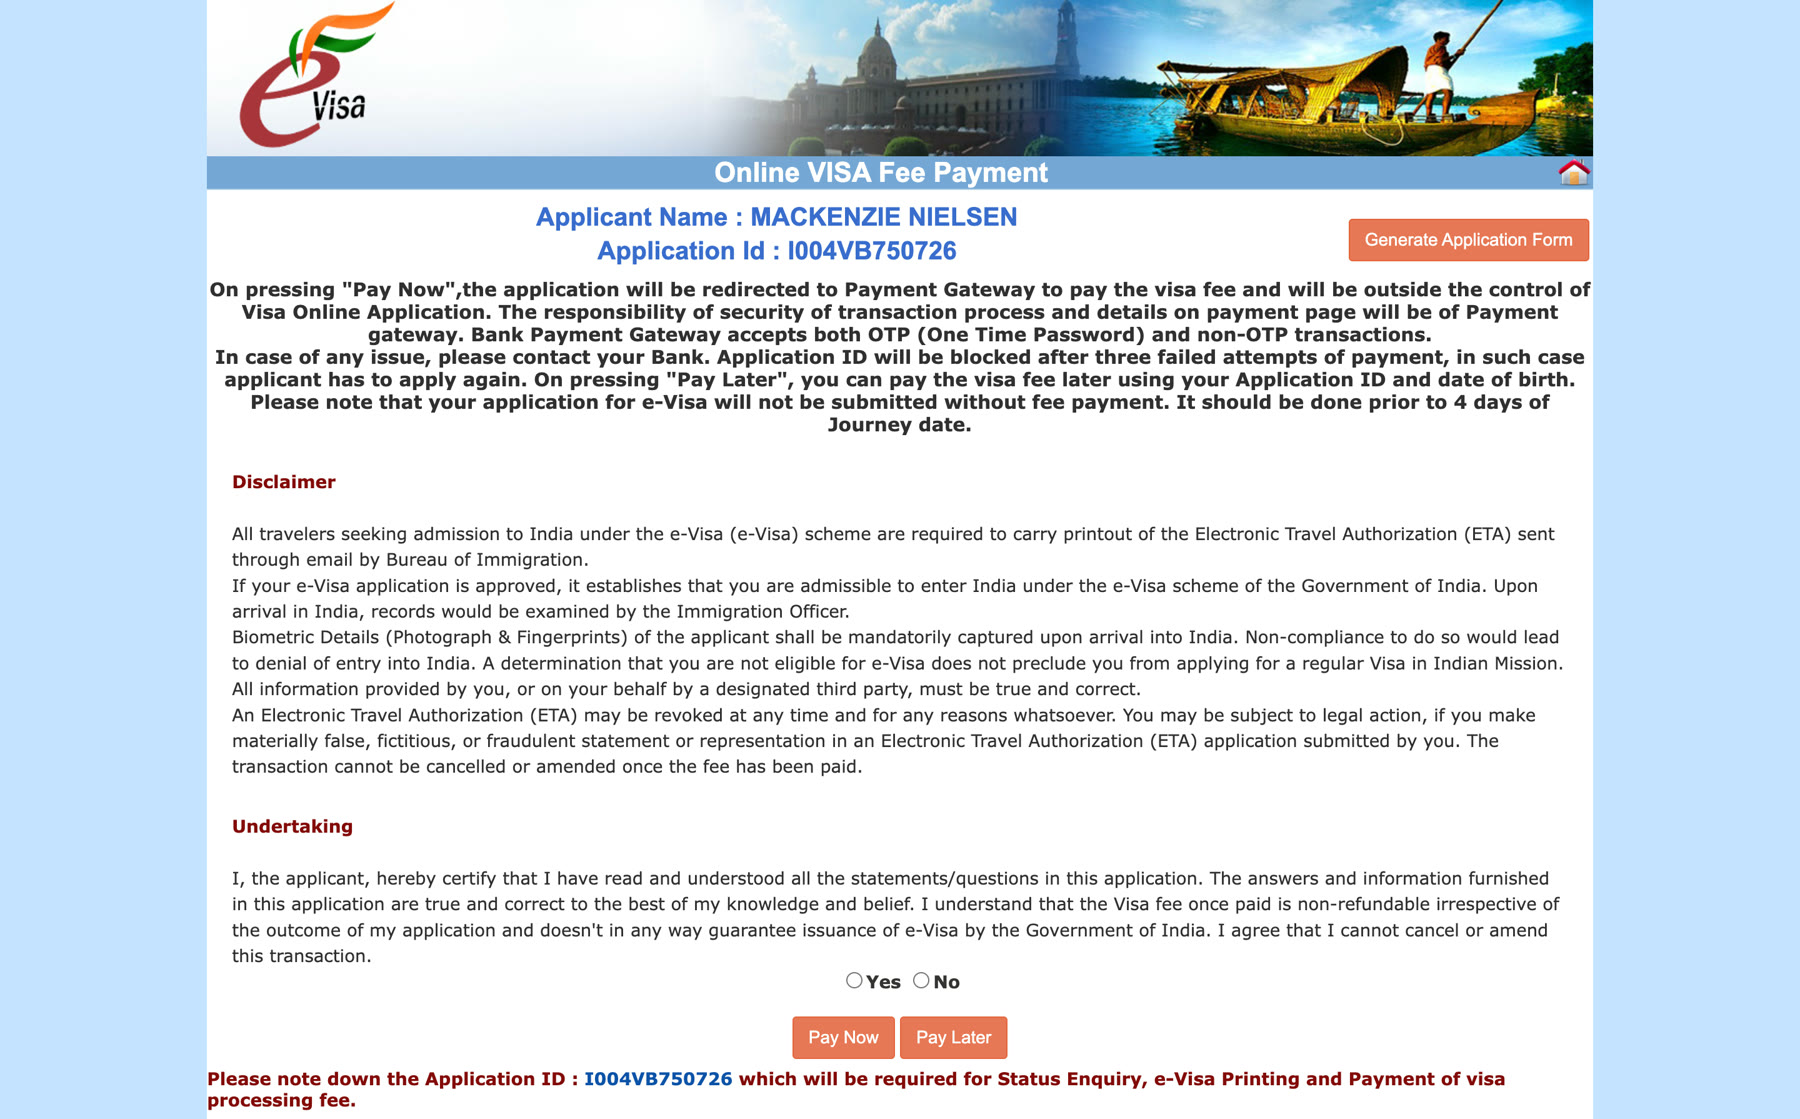
Step 14: Payment
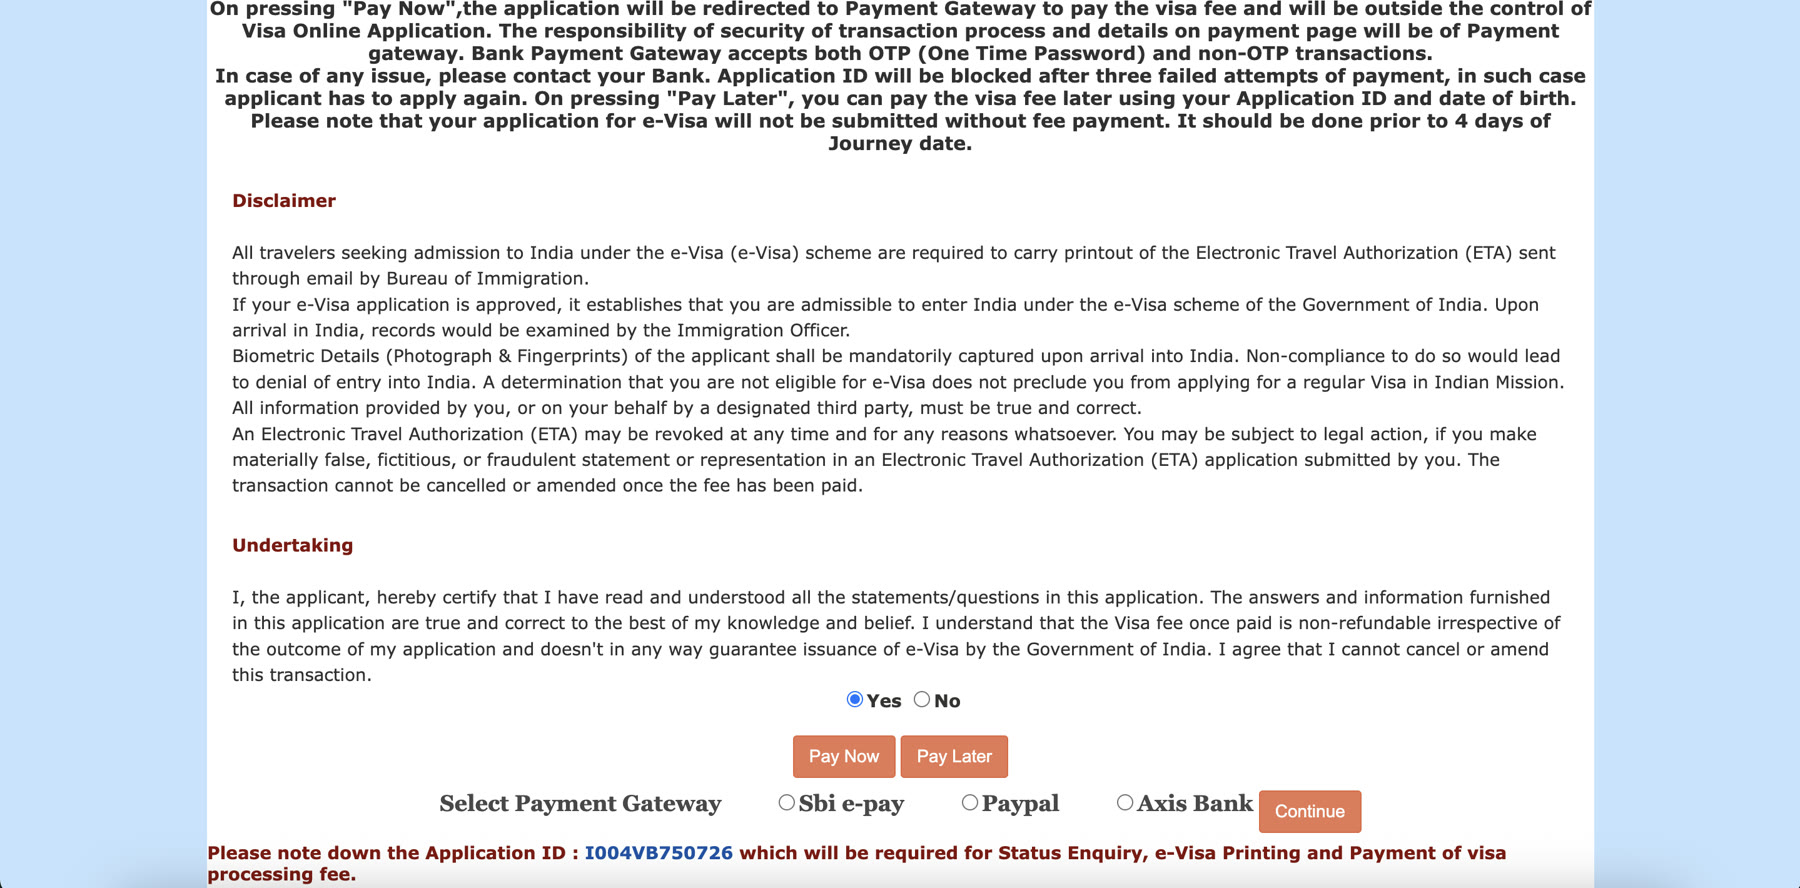
- Your Application ID and name are shown at the top. Note the ID down if you haven't already; you'll need it for status checks, printing, and any future payment.
- Read the Disclaimer and Undertaking, and select Yes to confirm you understand the fee is non-refundable regardless of outcome.
- Choose Pay Now or Pay Later. Paying later still requires completion within 4 days of your travel date.
- If paying now, select a gateway: SBI e-Pay, PayPal, or Axis Bank.
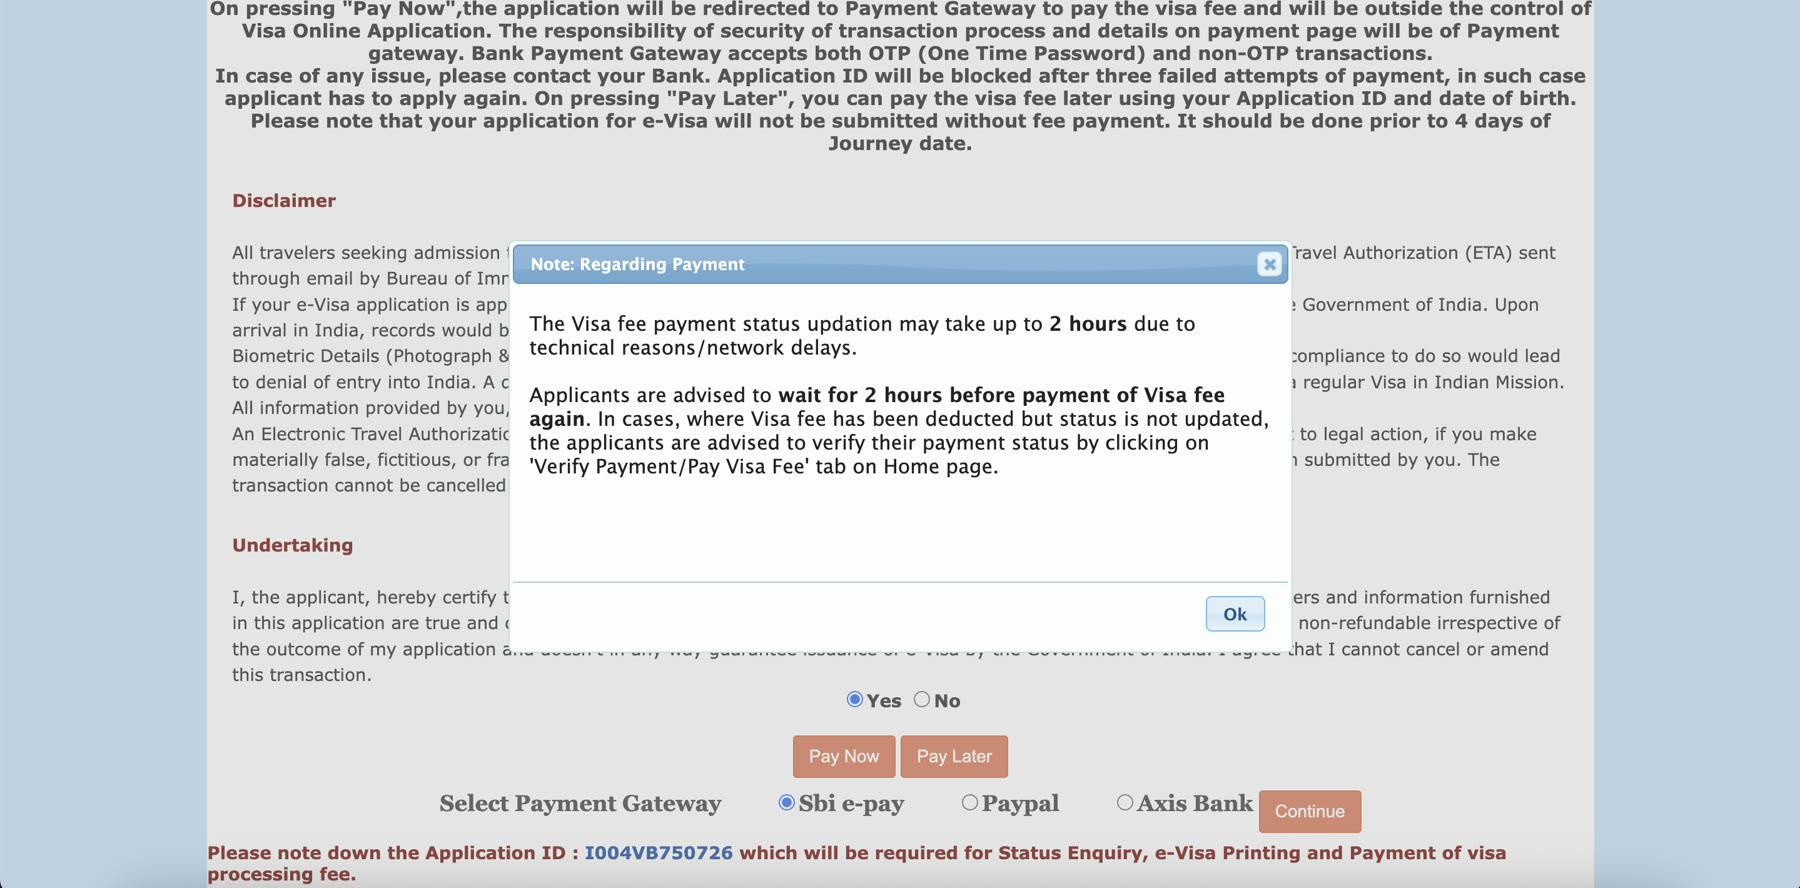
- A popup appears warning that payment status can take up to 2 hours to update. If your payment goes through but the status doesn't reflect it right away, don't panic and don't re-attempt payment immediately. Wait the full 2 hours, then check via "Verify Payment/Pay Visa Fee" on the homepage before trying again. Attempting payment 3 times unsuccessfully blocks the Application ID entirely, requiring a fresh application.
Step 15: After payment (unverified)
Based on the official instructions (not independently verified via screenshot, since this step requires an actual visa fee payment): after successful payment, you should be able to print an acknowledgement page summarizing your application and reference numbers. You'll then receive an email confirming submission, typically stating a 72-hour processing window, though real-world processing is often faster.
Once approved, you'll receive your Electronic Travel Authorization (ETA) by email. Print it and carry it with you. The ETA is not your visa; the visa itself is stamped on your passport by the immigration officer when you land in India.
Saving and coming back later
If you need to stop partway through, click Save and Temporarily Exit. The portal emails you a Temporary Application ID from noreply-ivfrt@nic.in. Search your inbox for "partially filled" if you can't find it, and check your spam folder.
To resume, go to indianvisaonline.gov.in/evisa/tvoa.html, click Complete Partially Filled Form, and enter that ID.
The Temporary Application ID expires after 7 days. If you leave it longer than that, the saved data is gone and you'll need to start the form again from the beginning. If you know you'll be away more than a week, plan to finish the application in one sitting instead.
(If you've been through payment and can confirm what the acknowledgement page looks like, screenshots are welcome to complete this guide.)
Last updated: 25 July 2026. This guide reflects the application flow on indianvisaonline.gov.in as of the date above. The Indian government occasionally updates its portal, so if something here doesn't match what you see, the official site always takes precedence.